
Article by Richard Grisafi
I’ve had my 40W Laser Cutter for just over three months now and I feel that I’ve got a good grasp on how it operates. Overall this is a good machine but it leaves a lot to be desired and the quality control is certainly lacking. The manual (at least the one I received) is written in poorly translated English and it really just skips over many important functions of the laser cutter. In addition, the pictures in the manual were inaccurate and there were various ports/connections in the manual that just were not on my model. Being that I’m a mechanical engineer who is used to accurate documentation, this is just deplorable.
Try to search online about the” 40W Laser Cutter” , “Chinese laser cutter”, “eBay Laser Cutter” or “K40 Laser Cutter” for information. You might see some reviews or complaints but there is very little information about its operation or maintenance. Understandably, this is going to frustrate people who shelled out a few hundred dollars to purchase this machine so I figured I’d be the one to do a write up and potentially save you some headache from my experience.
I’m writing from my experience only and I’m not responsible for any damage you cause with information you’ve read here or anywhere else. A laser cutter is a powerful and dangerous tool and it’s not a toy. Use it at your own risk. That being said click below to read on.
Unpacking and Setup
First of all, I open the laser cutter to find my vent duct completely bent. It’s still perfectly functional but it’s not a good sign to see something bent and crammed carelessly into your new toy. It was not off to a good start

Next I notice the exhaust fan is too tall for the laser cutter. The fan actually sits slightly above the top and leans back. I’ve seen others like this so I guess it’s normal although unsightly. As a designer if I couldn’t have found another fan that fits, I probably would have increased the height of the laser cutter. I have no idea why they thought this was acceptable.
I feel like it’s a popular misconception that this fan was provided for cooling the laser or mirrors. It’s only to remove smoke and avoid poisoning everyone in the same room. It also helps the laser to cut without interference from smoke. There is another model (minor upgrade) that provides an aquarium air pump which blows air onto the work piece and prevents smoke from interrupting the laser path.

There was a screw holding the laser tube compartment shut as well as the control panel compartment. Although I feel it was necessary for shipping, it’s not necessary to keep the screws there. You may discard them if you’d like. Just out of curiosity I opened the laser tube compartment and noticed it was filled with bubble wrap. I removed it but I’m about 80% certain this would have been an instant fire had I not since it was actually blocking the laser path. They also put a sticker on the laser tube which I don’t think was a good idea since I couldn’t remove it.
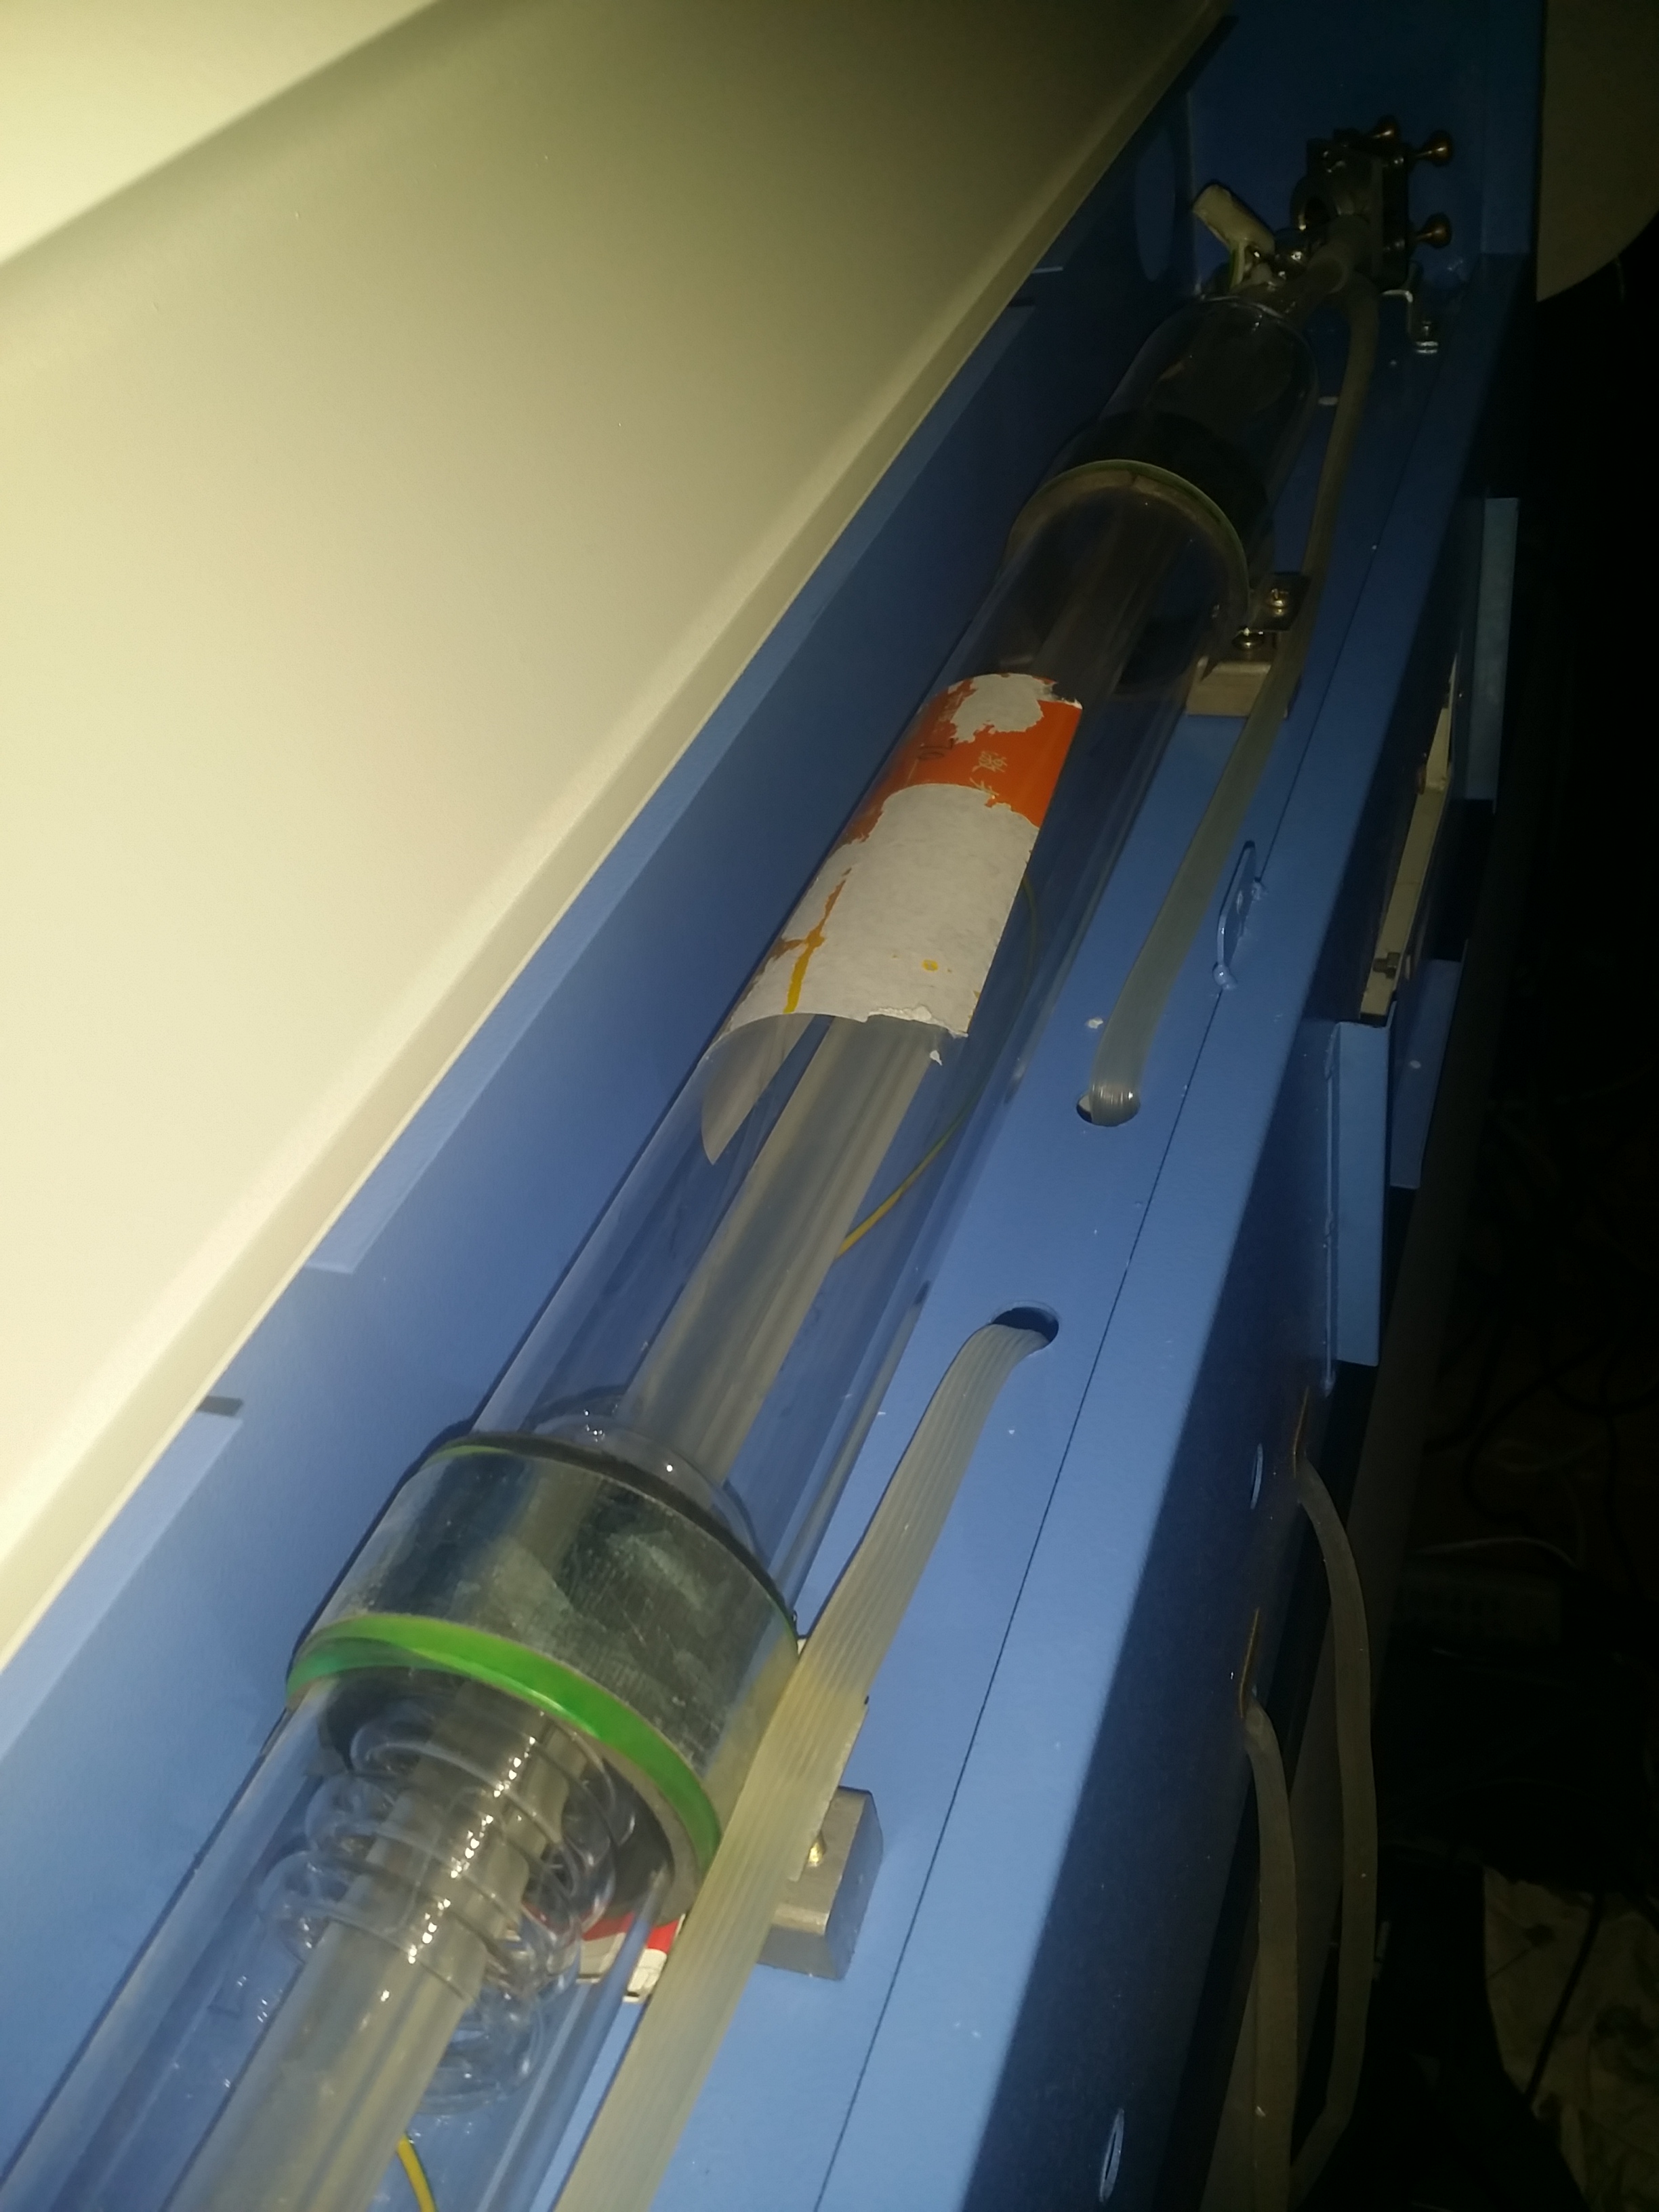
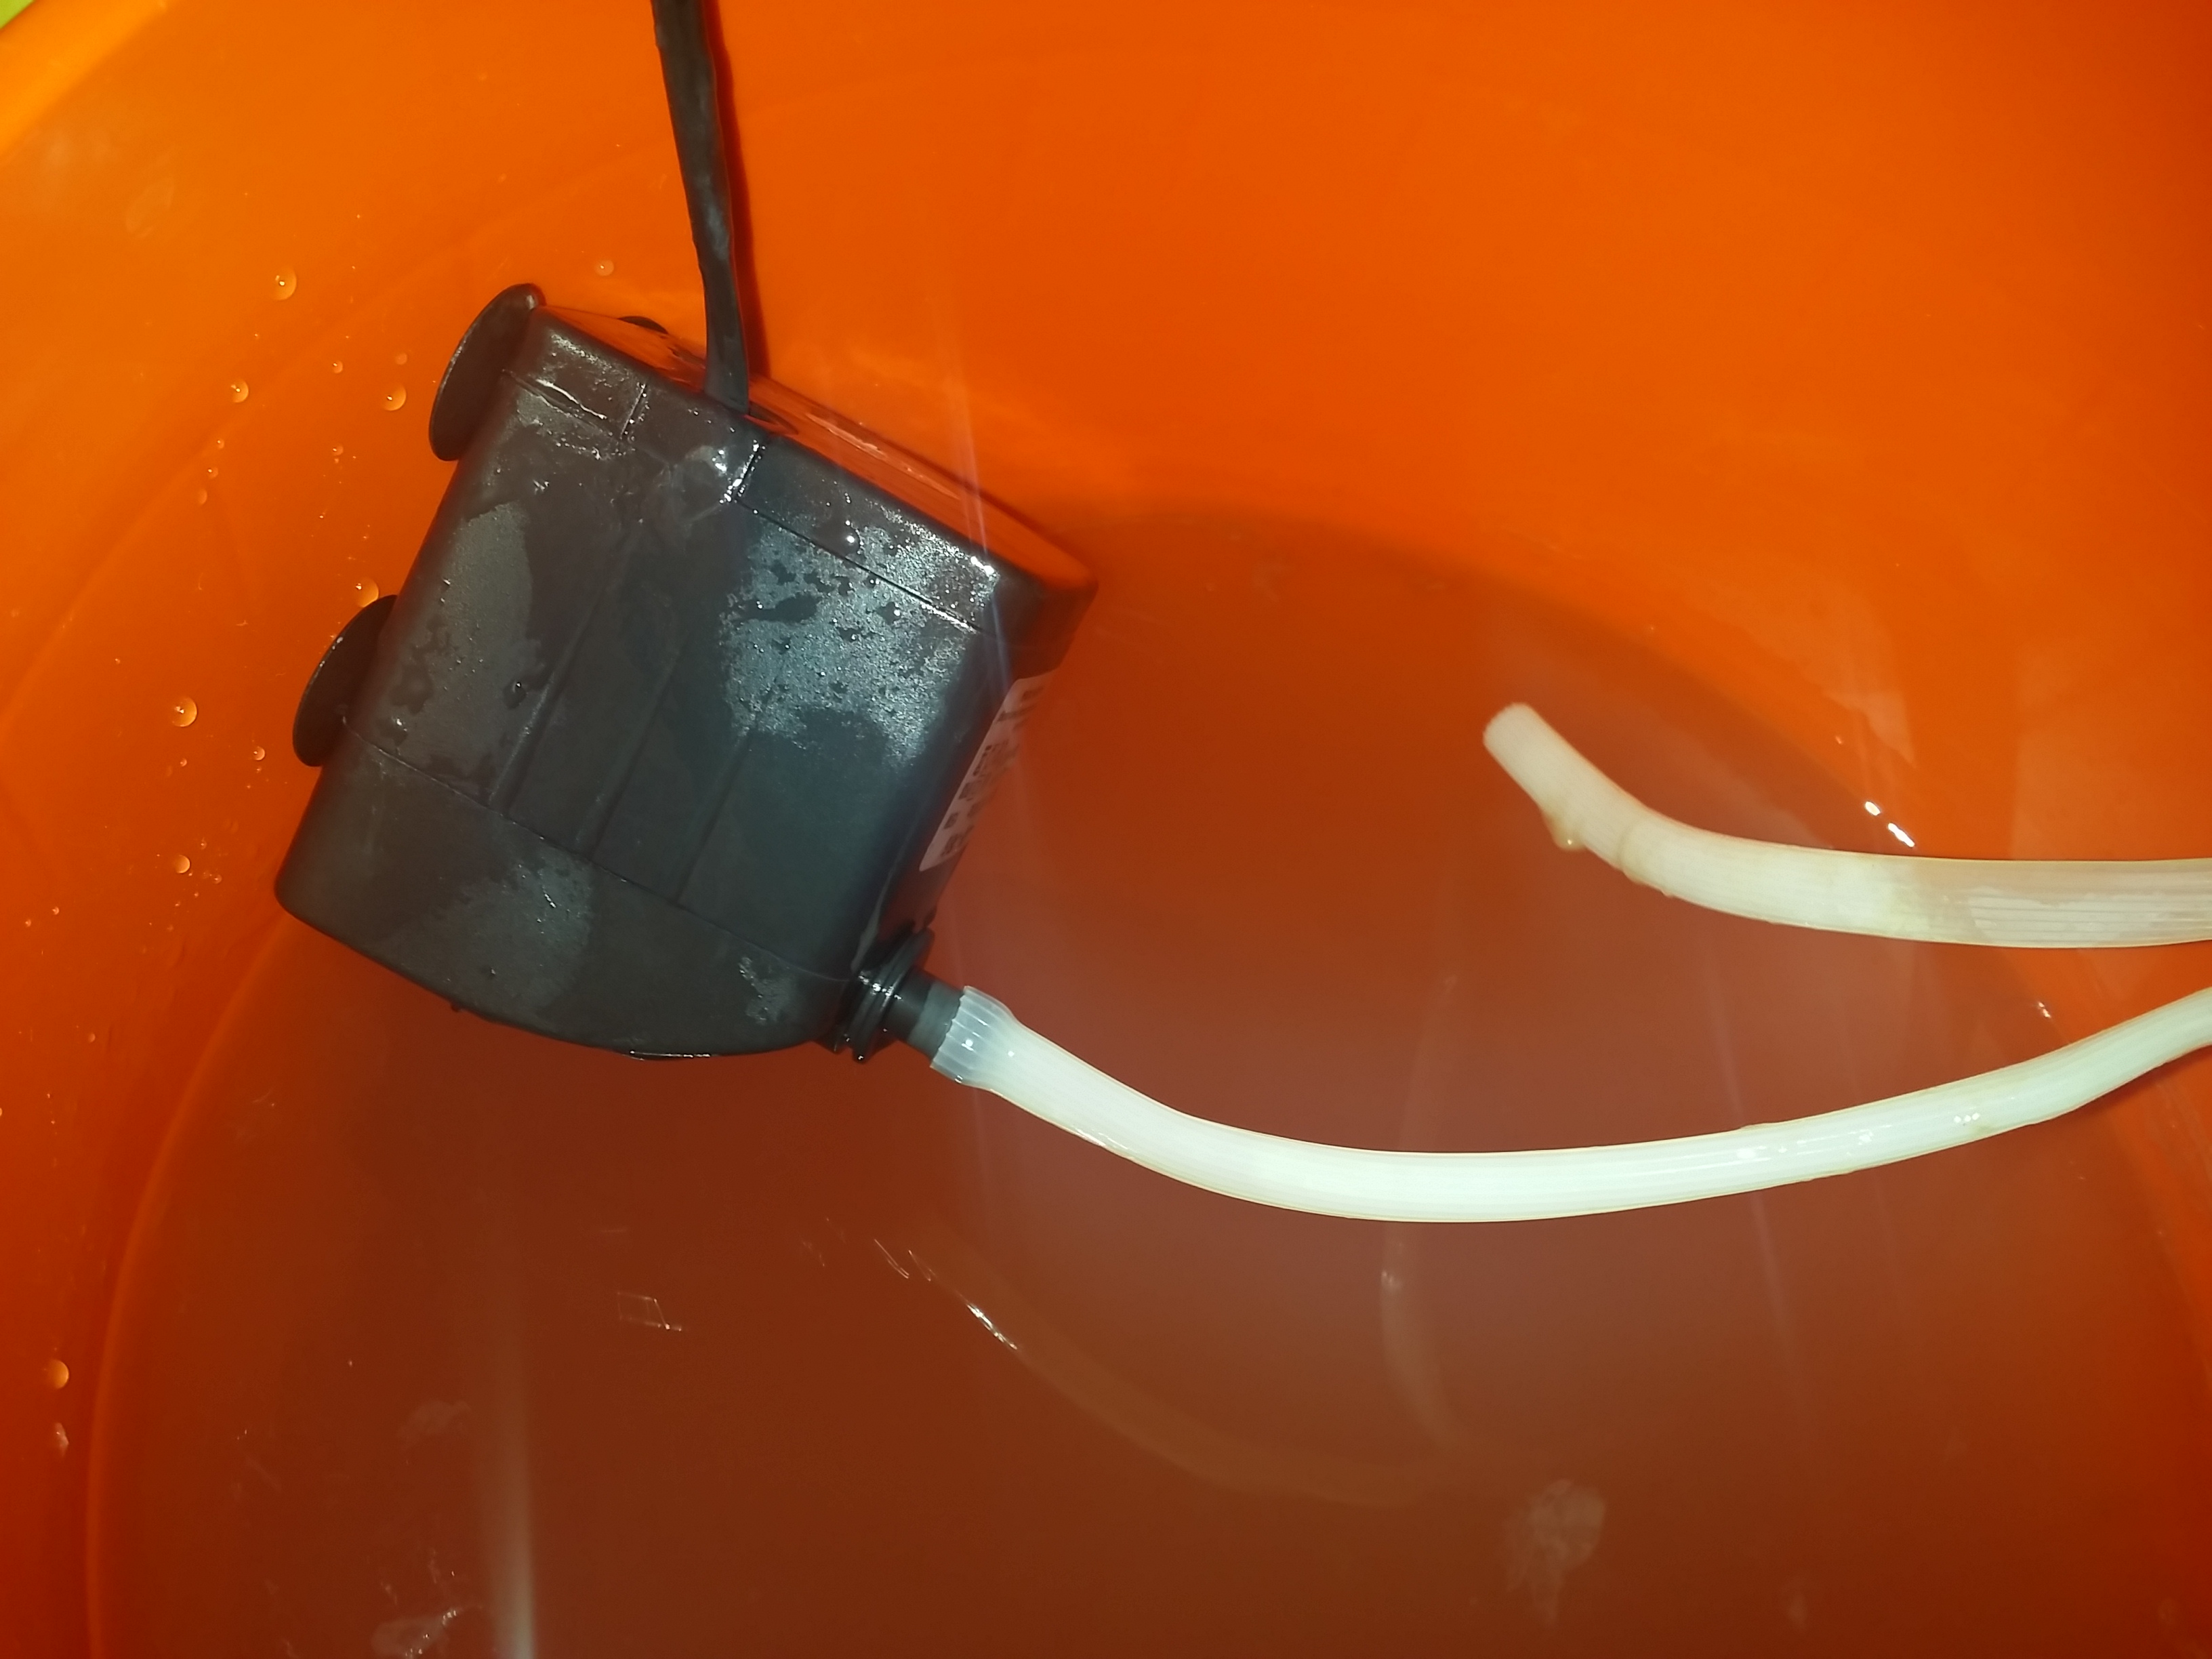
Next you will note the water pump. My first thought was “This can’t be an aquarium pump can it?”. Just to clarify – Yes it is. It’s not even a very good aquarium pump at that. You also need a water reservoir. I use a 5 gallon bucket from Home Depot but anything that can hold several gallons of water should be fine. As a lesson in heat transfer, the more cooling water you have in your reservoir the more heat you can absorb so it benefits you to have your bucket nearly filled. Make sure to use distilled water or at the very least purified water. It doesn’t hurt to add frozen ice packs or ice cubes if the water starts to get warm during operation but remember not to get the water too cold. We all know what happens to hot glass when you fill it with cold water. If you notice the water is getting too warm then either quickly cool it off or stop the cutting process. Overheating it just once can and likely will be enough to kill it.
As for the connections, my instructions had it totally backwards from how it was on my laser cutter. In the manual, the input was on the opposite side that it was supposed to be on. It was correctly labeled on my laser cutter but if I just followed instructions blindly I’d probably have a broken laser tube. So just to make sure, the water input on the laser cutter is connected to the pump output. The pump is supposed to sit at the bottom of your water reservoir where it draws in cool water through its vents. The output tube from the laser cutter can be loosely hanging into the reservoir. The tubes in my laser cutter were already filled with water (?) which naturally leaked everywhere during shipment and the control panel shows evidence of being wet.
Mirror Alignment
Maybe I’m unlucky but mine had misaligned mirrors when it arrived and of course the manual had no information describing how to align the mirrors. I thought the laser was broken because it would just sort of trail off and stop cutting through the material.

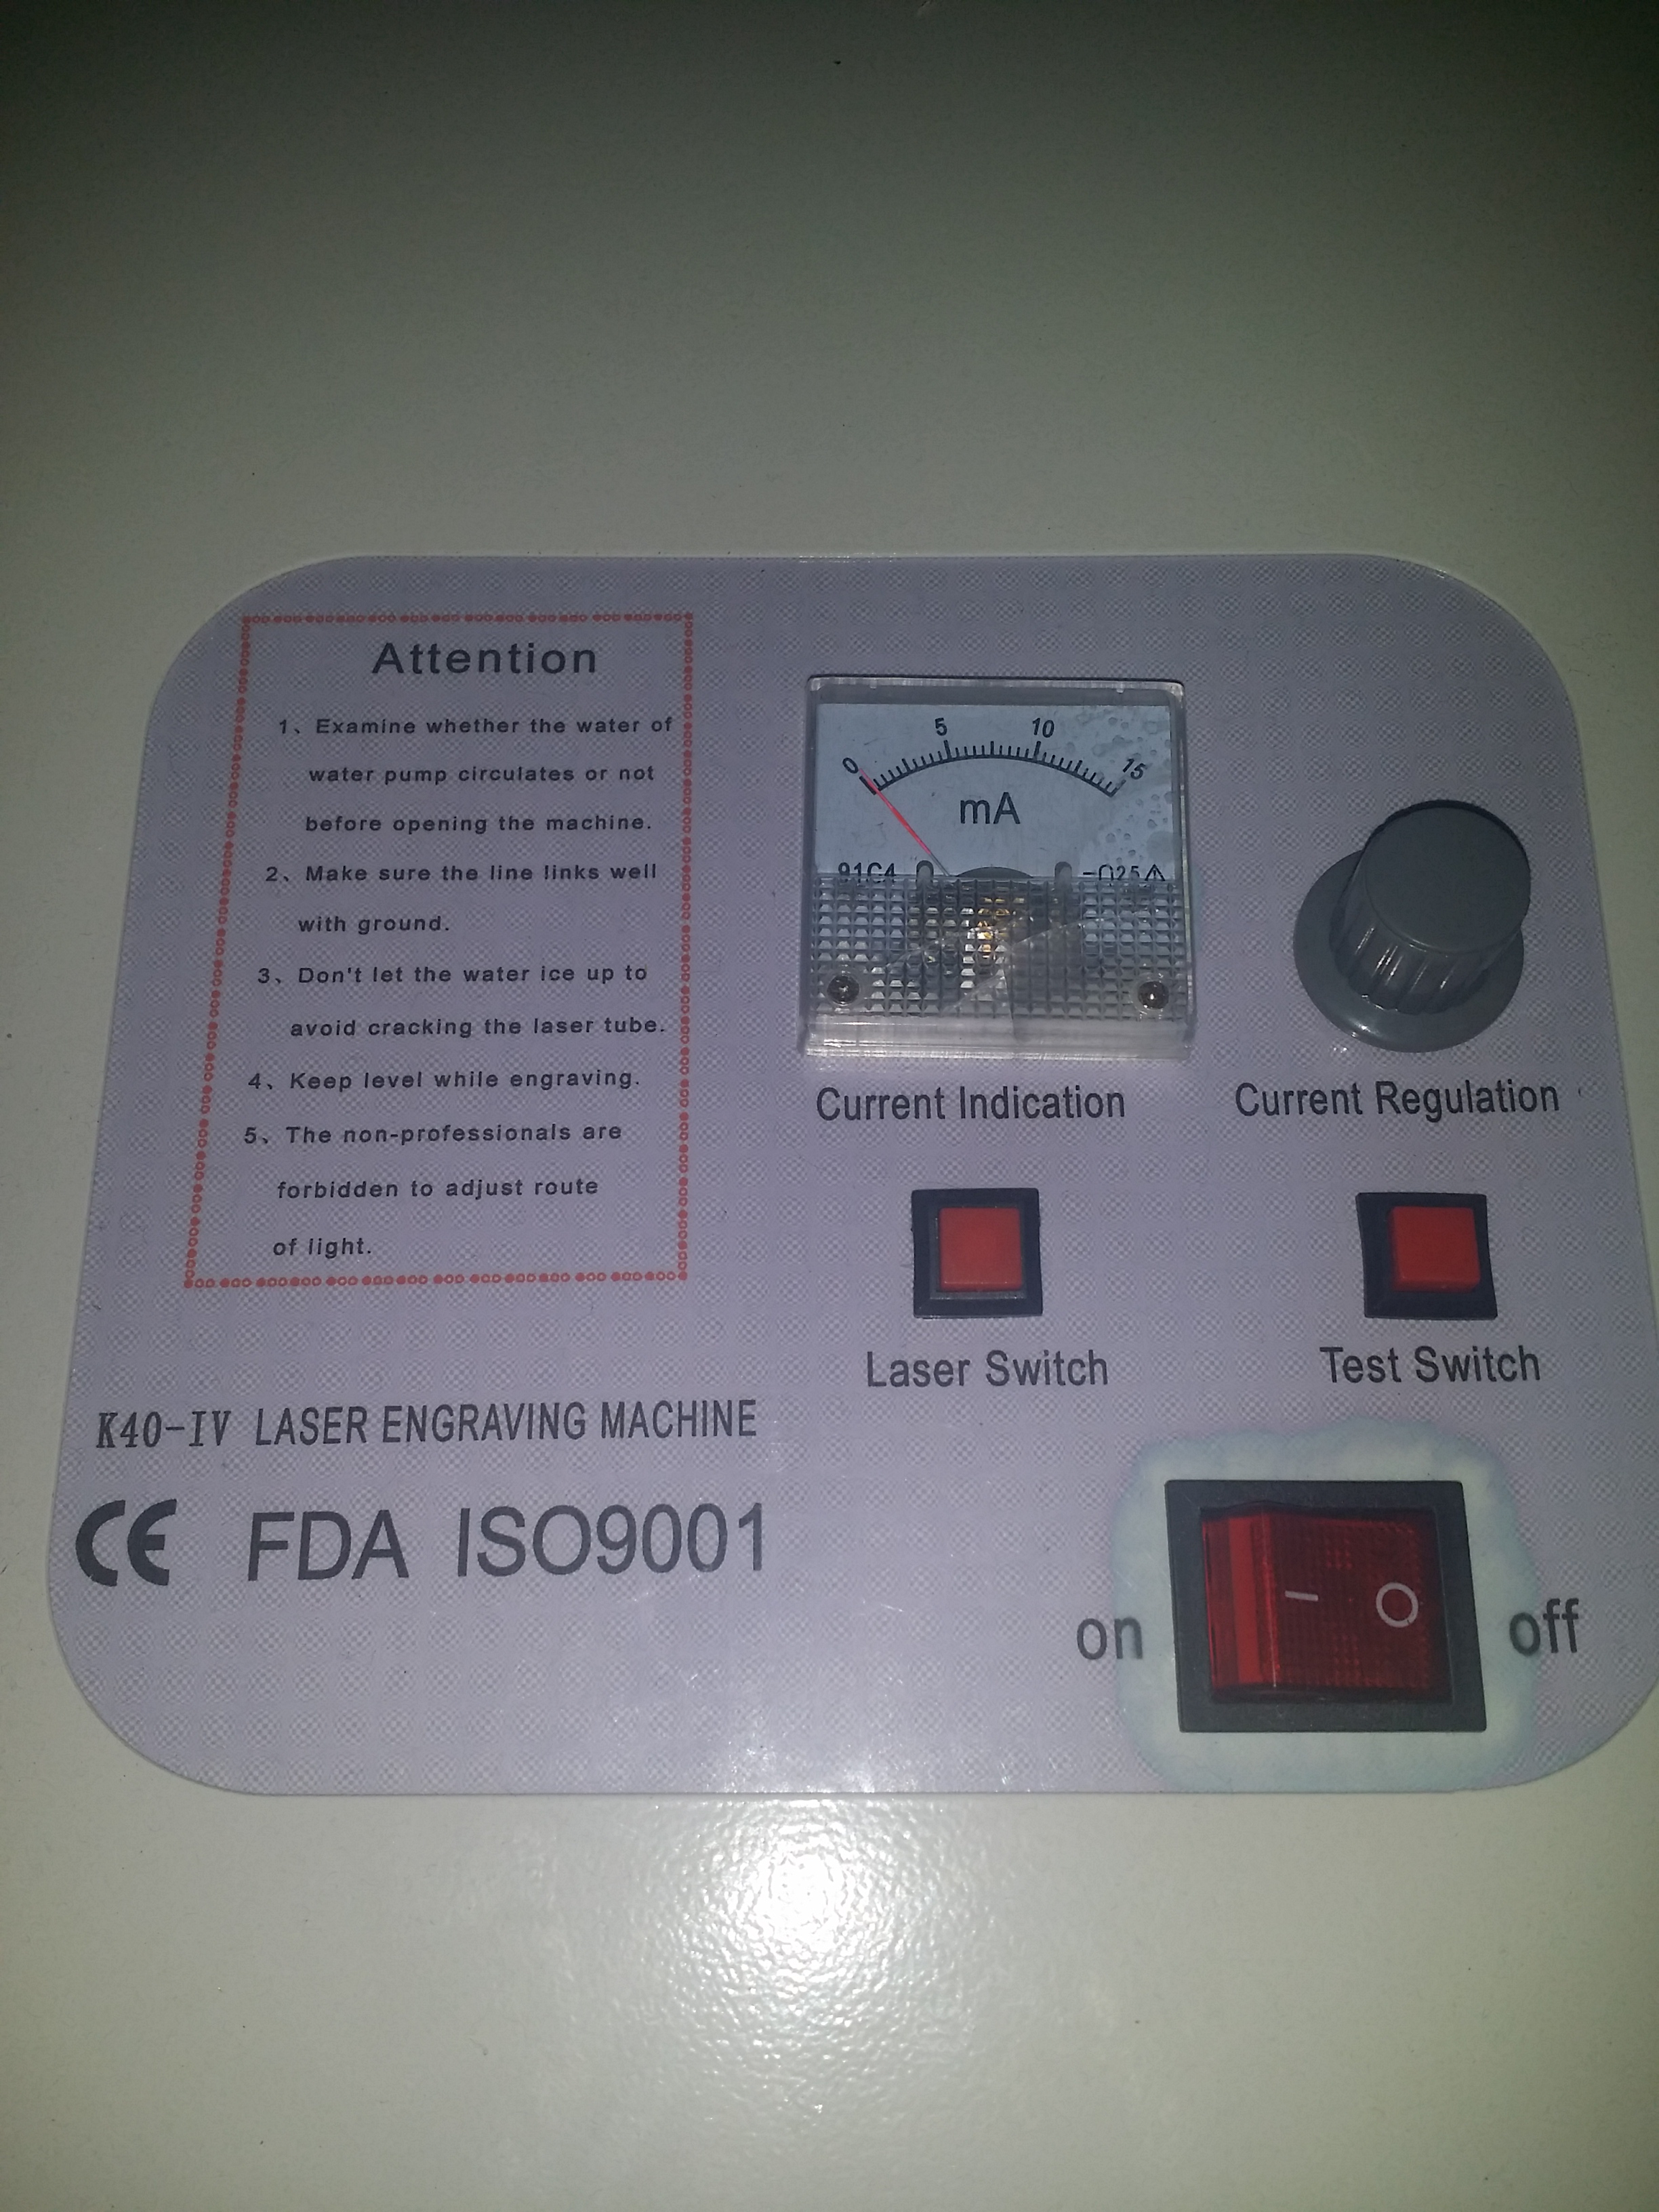
As it says on the control panel “The non-professionals are forbidden to adjust route of light”. Well I guess I have to call my local laser cutter repair technician right? No. It’s fairly easy to align the laser especially with such a small work area. I’ll show you how.
You will need thermal receipt tape (I’ve seen people use mailing labels also). I took some receipt tape from my friend’s restaurant but you can use an old receipt if that’s all you can get. I’ve noticed lately CVS gives you a five foot receipt if you purchase a pack of gum so that should leave you covered.

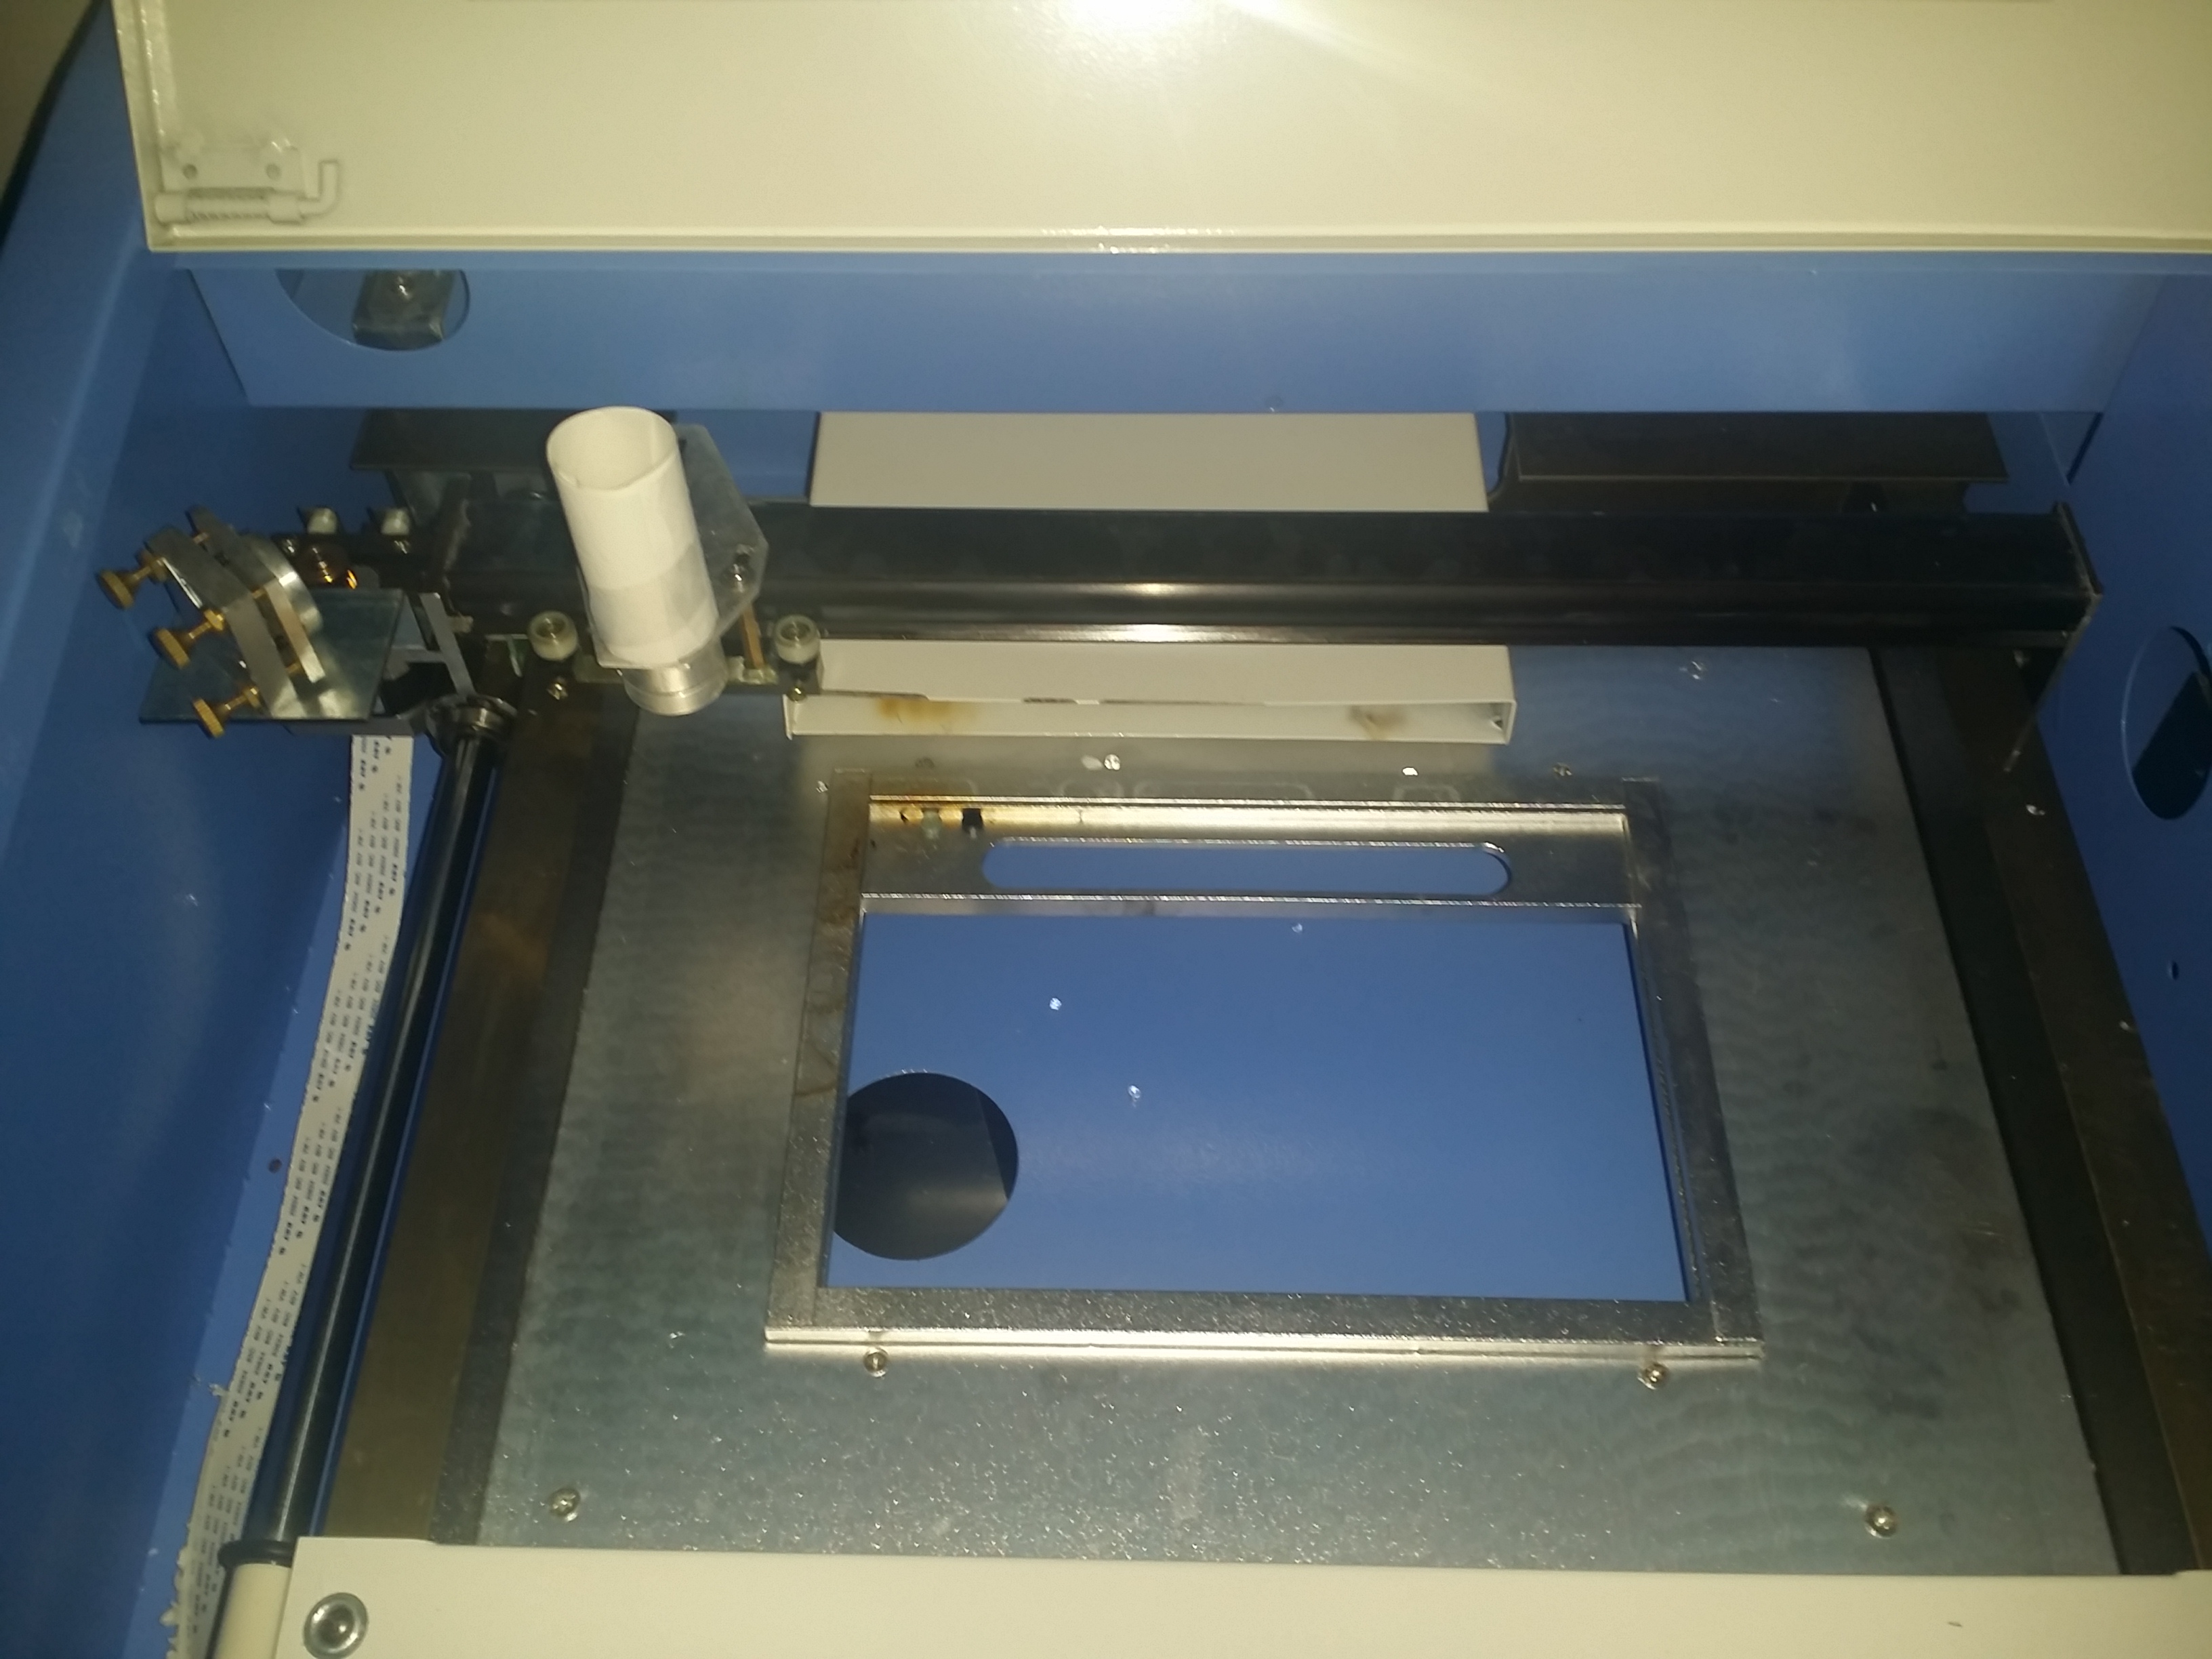
You start with the mirrors in the upper limit or home position and then you wrap receipt tape around the Y axis mirror as shown below. Make sure this is tight and try to keep the receipt tape flat against the mirror. If you wrap it around more than once that’s fine too. You may tape it in place as long as there is no tape in the laser path.
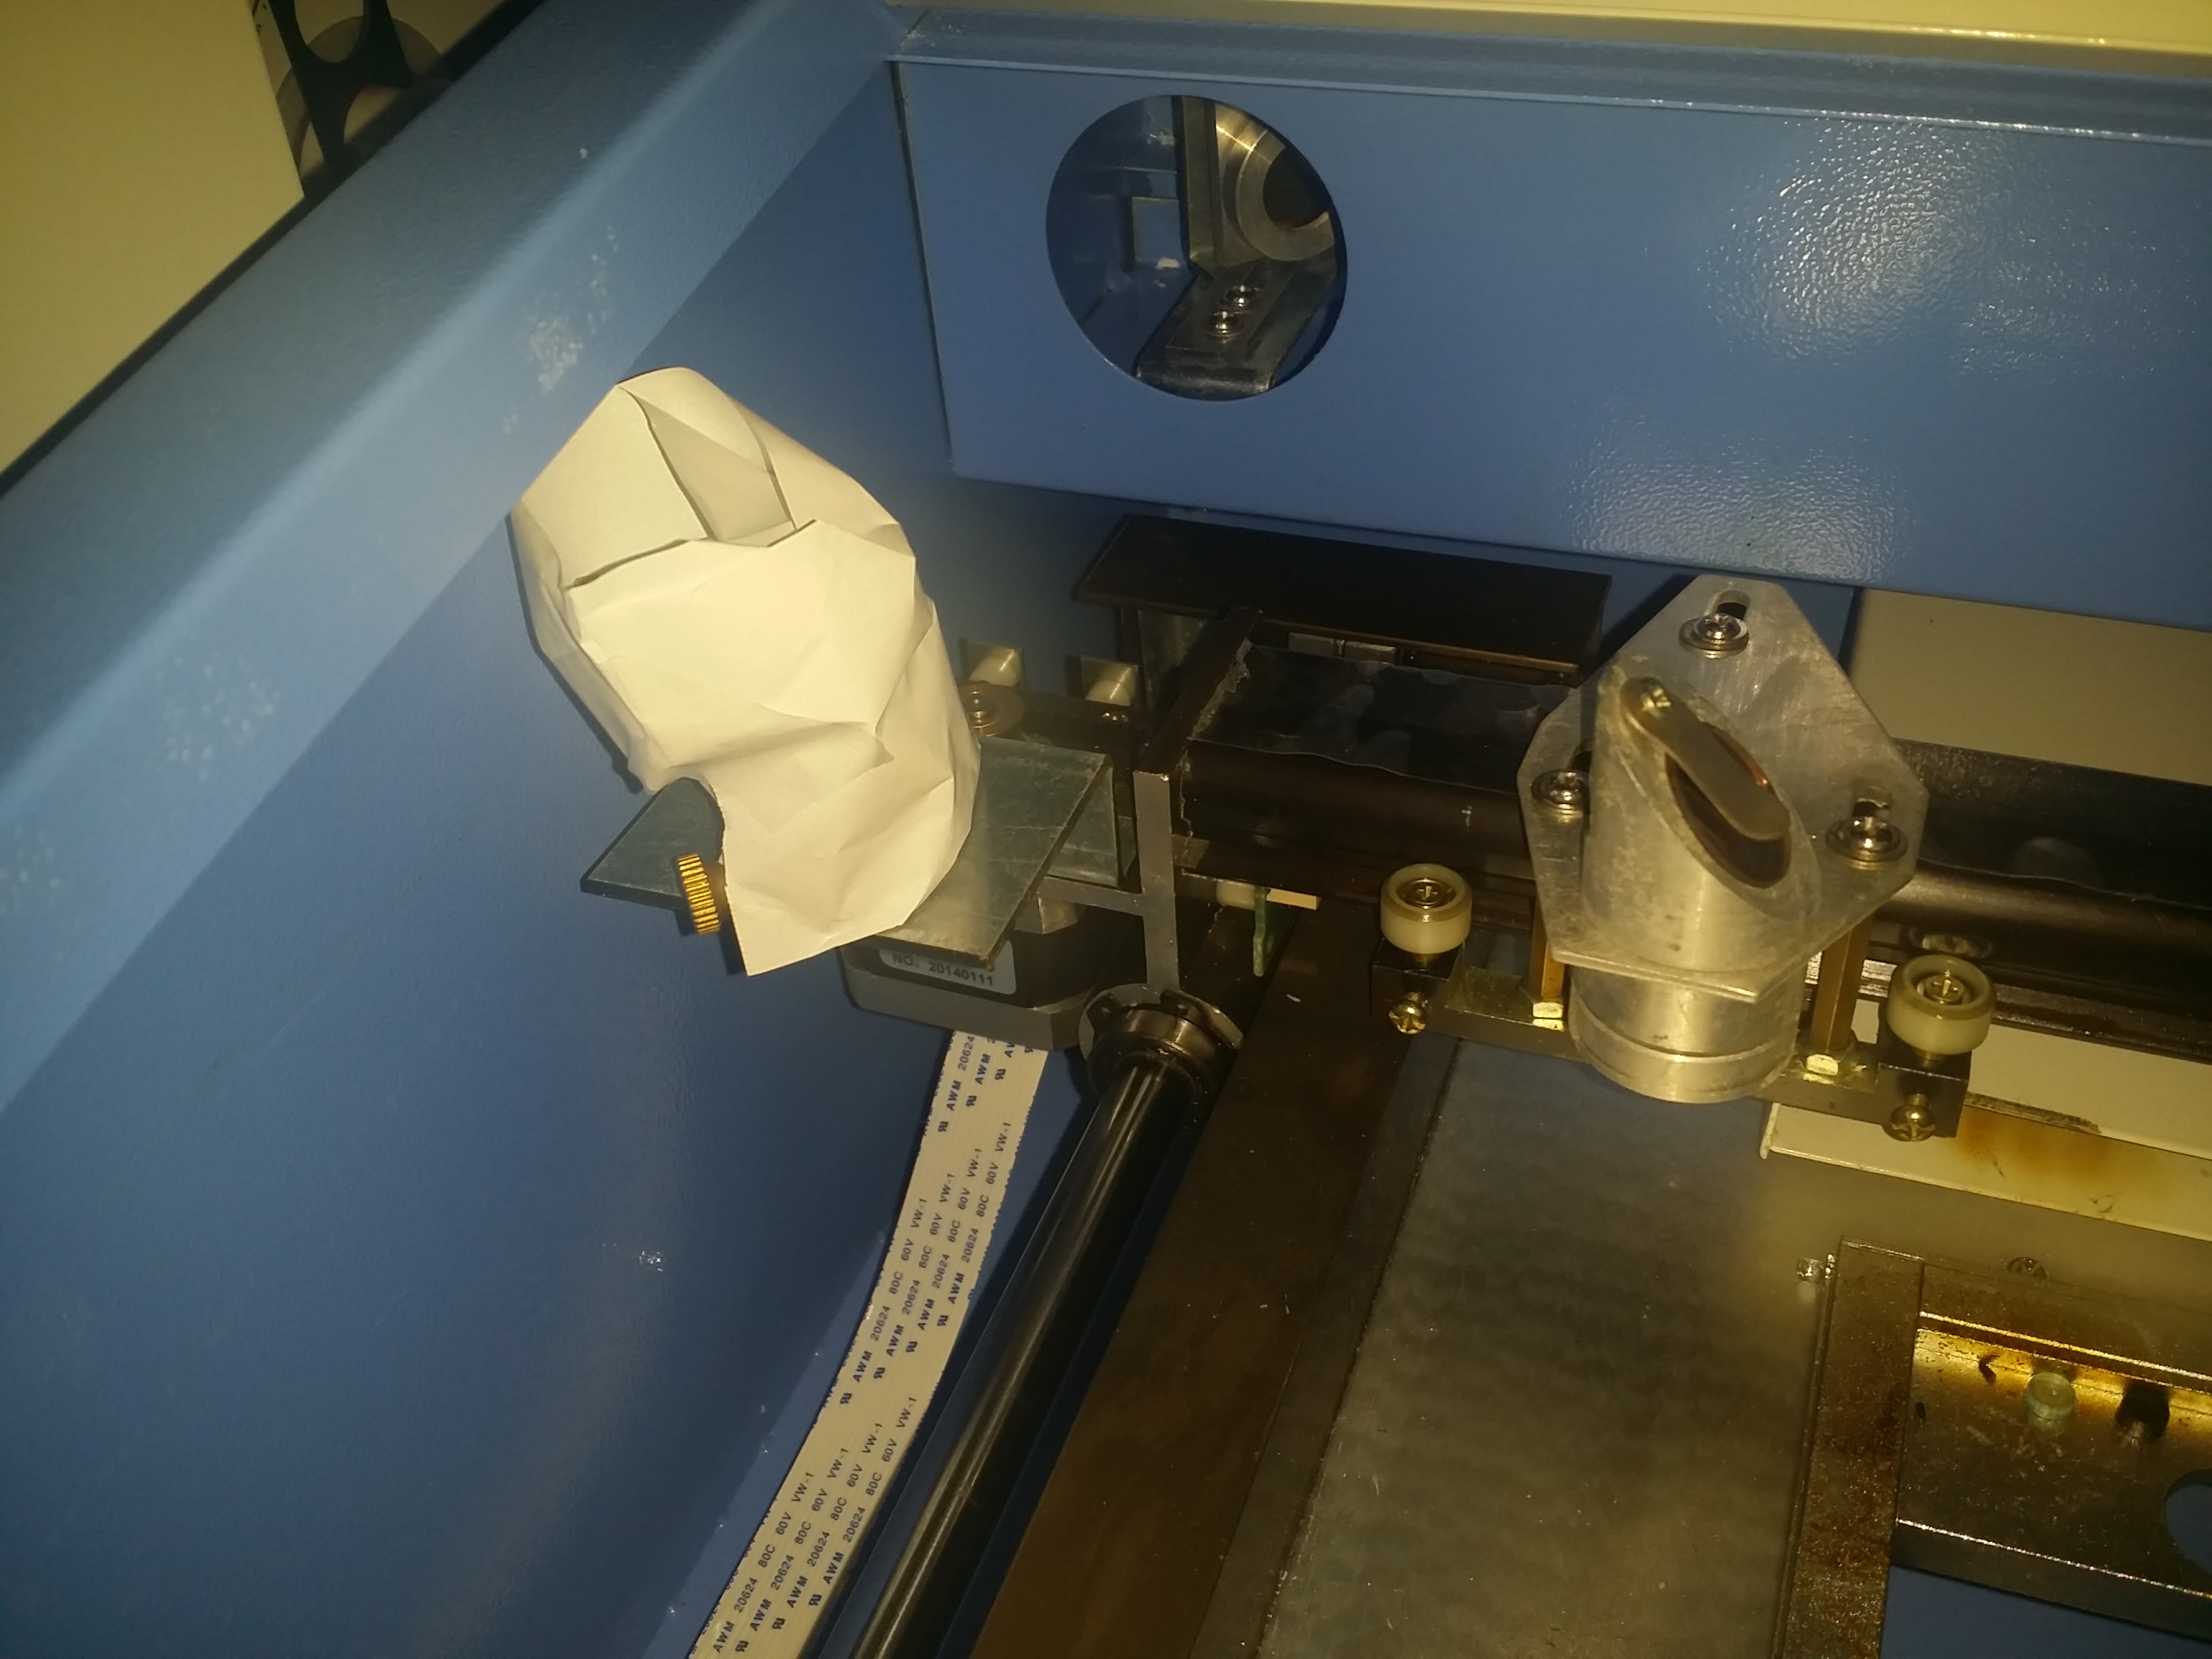
Close the door and quickly tap the “Test Laser” button once. Unless you’re unlucky the laser will make a hole right through the receipt tape. Next, without disturbing the receipt tape, move the Y axis mirror all the way to its lower limit. Once again, close the door and hit the “Test Laser” button. If your mirror is aligned it will look like the picture below.
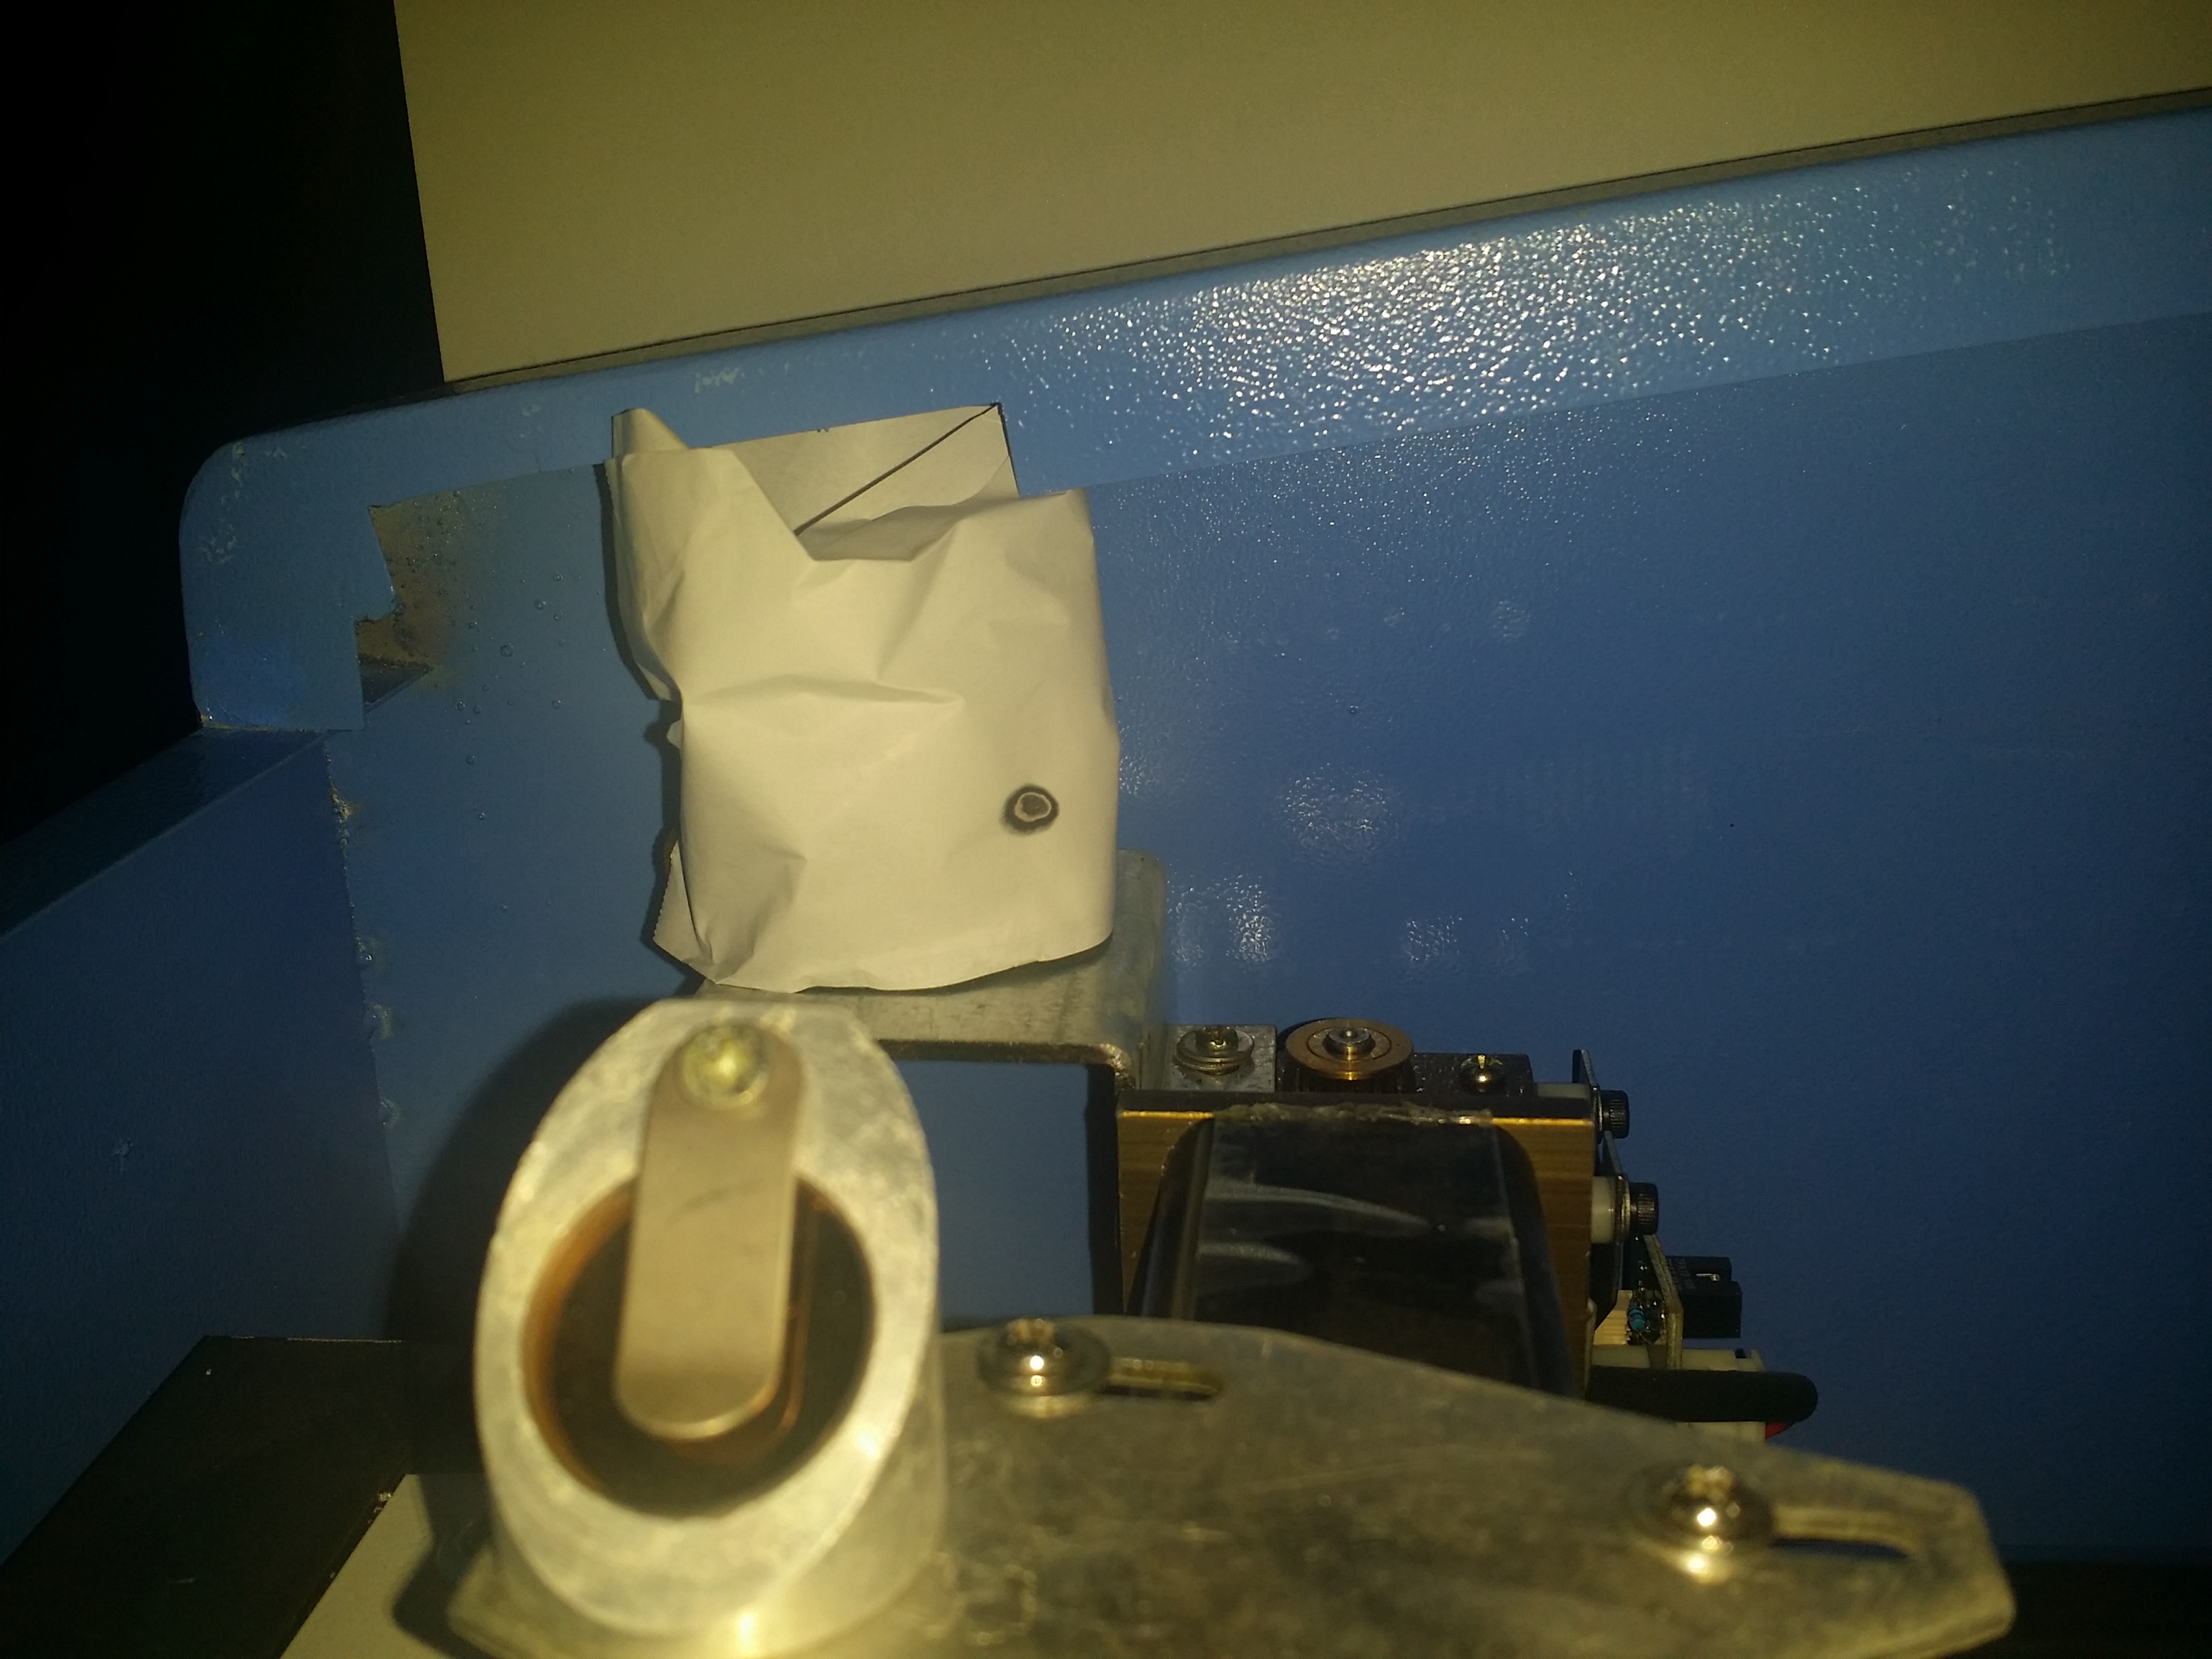
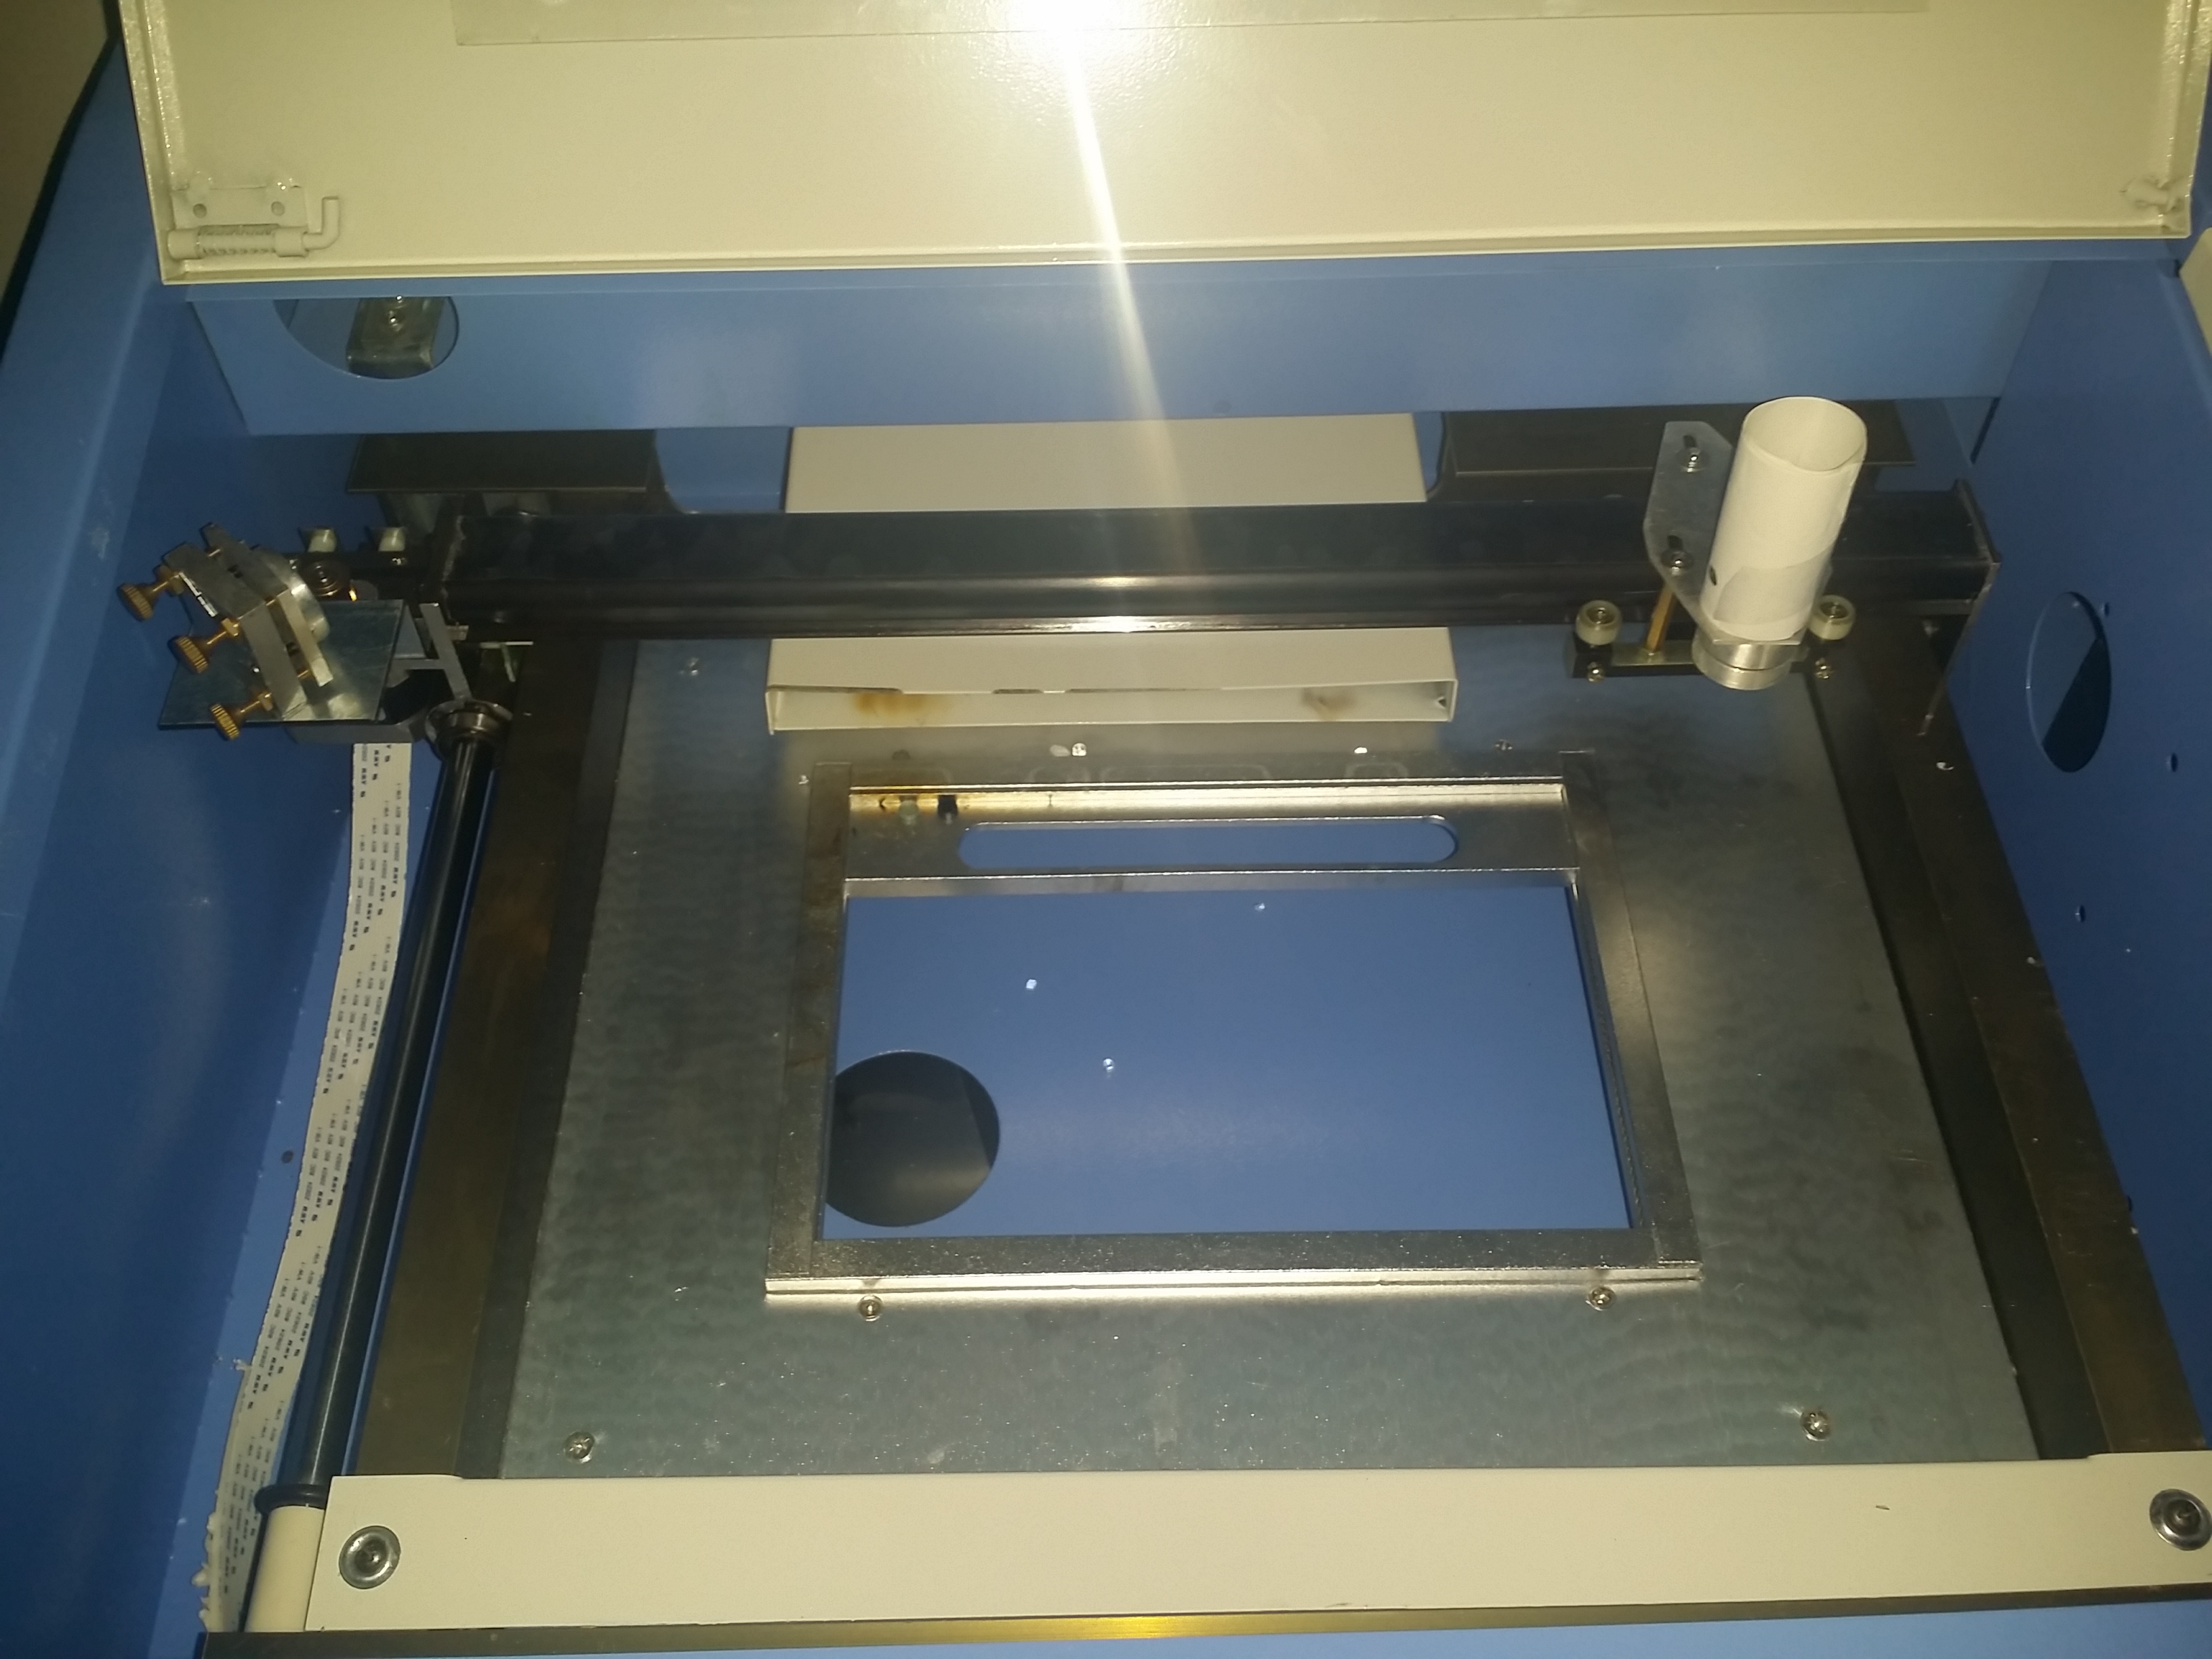
If you see two holes, one elliptical or elongated hole, or nothing at all, then your first mirror needs to be adjusted. This is the mirror directly in front of the laser tube (Shown below).

Fortunately my first mirror was correctly aligned (Good thing I had all that bubble wrap filling the compartment). If your not as lucky as I was then you have to adjust the mirror. If the second burn hole was higher than the first then you have to angle the mirror slightly down by turning the upper thumb screws. If it was slightly lower then angle the mirror up. Repeat the whole alignment process with clean receipt tape until you have a nice round burn hole. Then remove the receipt tape and clean the mirror. I recommend Zeiss Lens Wipes available on Amazon. You don’t want dirt or carbon deposits on your mirror because the dirt will absorb heat whereas the mirror is supposed to be reflecting it.
Once you have a nice round burn hole and a clean Y axis mirror then set the mirrors back into the home position and wrap receipt tape around the X axis mirror. This is the same concept as the Y axis mirror so make sure the receipt tape is tight and is not easy to disturb.
Once it’s ready, close the lid and hit the “Test Laser” button. Unless you really blew the last part there will be a hole in the receipt tape. Next move the X axis mirror all the way to the right limit without disturbing the receipt tape.
Once again, close the lid and hit “Test Laser”. If it’s aligned correctly then it will have a single round hole like the one shown below.

If you have more than one hole or an elongated hole the Y axis mirror must be adjusted by turning the brass thumbscrews on the back of the Y axis mirror. If the second hole is higher than the first the mirror must be angled down slightly. If it’s lower than the first then the mirror must be angled up slightly. Note that I had to use pliers to turn my thumbscrews because they were very tight. Repeat this process with fresh receipt tape until you have a clean round hole. Once this is done your mirrors are aligned correctly. You may now discard your pile of burnt receipt tape.
Software
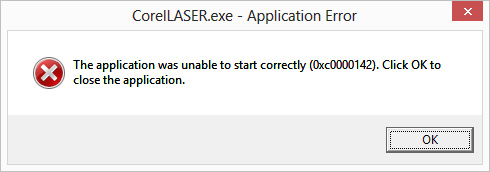
So I opened the envelope included in the package and there are two DVDs and a USB Dongle with no explanation of either. One DVD contained Corel Draw with a product key (I’m sure it’s legit) and the laser driver software called CorelLaser which seems to be an add-on package for Corel Draw. It also contained LaserDRW which I didn’t install. I have my own copy of Corel Draw which was ironically the same version so I didn’t install theirs. I installed CorelLaser which appeared to install correctly but for some reason I couldn’t get it to work with Windows 8. It just said “The application was unable to start correctly (0xc0000142). Click OK to close the application”
So I tried two different Windows 8 machines and the same issue happened with both of them. I tried it on an old Windows 7 laptop and it worked just fine even with my legitimate version of Corel Draw. Either it’s not compatible with Windows 8 or it’s some flaw with two of my computers (doubtful).
I checked the other DVD and it seemed to have training videos which were basically incoherent as well as some sample graphics to get started with.
So that leaves the USB dongle. I thought “Oh great more software” but it’s not. It’s sort of like a hardware key to use their software. I believe CorelLaser can be freely downloaded but it can’t be used without this key. It’s like a product key (The one they included with Corel Draw) except it’s a physical key.
Don’t lose it. I’m assuming this is not easily replaceable. The software company has a site 3wcad.com and it’s entirely in Chinese. If you want support for this just pray to the support fairies. You’re not going to get it from them so just search around the Internet and hopefully you can find someone who knows the software better.
I believe some other similar laser cutters have Moshidraw included which from what I understand is even worse. I don’t know anything else about it though. CorelLaser uses the Corel Draw interface which is why you need to have Corel Draw installed. There’s not much of a learning curve especially if you know how to use Corel Draw.
Tips, Warnings, and Suggestions
Watch out for the hole – Alright so I cut my first piece of acrylic and it’s going pretty well. I know you’re not supposed to look at the beam but I smell something burning so I quickly glance. There is an open hole in the base of the laser cutter and apparently the laser is powerful enough to cut through the material and halfway into your desk. I quickly inserted a piece of acrylic to prevent more damage to my desk. It’s not a bad idea to purchase a honeycomb bed on eBay. Just search for “honeycomb bed laser”. My laser cutter is sitting on top of a $70 desk from Ikea so I’m not going to lose sleep over it but be careful especially if you have an expensive work table.
Protect your eyes – This should go without saying but NEVER look into the beam. You can’t see a CO2 laser with your eyes but you can burn your retinas out in a fraction of a second if the beam is reflected into your eyes. Purchase CO2 laser safety goggles if you plan on doing a lot of cutting.
Be careful what you cut – Wood, cardboard, and acrylic should be safe. Don’t cut anything containing chlorine which includes PVC and Vinyl. Polycarbonate (Lexan) is not safe to cut due to fumes. Polystyrene (Styrofoam) is known to start fires which are difficult to put out so avoid cutting that. Although I’ve heard glass can be engraved you will not be able to cut it. Cutting metal and reflective surfaces can reflect the laser back into the tube which can damage it. There are tricks to engraving metal and I know it’s possible to cut thin metal however I’m not going to do it. If you’re unsure, then it’s best to err on the side of caution. Do your research before you cut a new material.
Keep a fire extinguisher handy – This should go without saying. Fortunately I’ve never needed mine and I hope it expires without being used. If you notice a piece catch on fire the last thing you should do is panic. Calmly stop the laser cutter, open the door, and try to put the fire out. If you can pick it up and bring it to a sink then do that. If it’s starting to get big, just spray it with the fire extinguisher. Worst case, you need a new laser cutter. It’s cheaper than a new house. I only had one instance where a fire started. I was cutting cardboard too slowly and it just ignited. I shut the machine off and tried to blow the fire out. The exhaust fan is ironically fanning the flame by drawing in fresh oxygen so I removed the piece and just ran it under water. Disaster averted.
Get a DSP controller – If you’re absolutely fed up with the software and you are tearing your hair out trying to get it to work, then you can purchase a DSP controller for a few hundred dollars. This will allow you more freedom to choose the software you want. It’s an expensive upgrade but it’s a great one. Just search eBay for terms like “DSP Controller 40W Laser” or some combination of that.
Conclusion
I’m going to be honest. This is not the best laser cutter money can buy. In fact, it’s probably the worst. It has many flaws, there is no support, quality control is just out the window, and it’s pretty weak. It comes with poor software and it’s hardware is pretty low quality too.
That being said, if you don’t have a laser cutter then mine is certainly better than yours. I only paid $478 for mine. It has cut through plenty of materials and it’s incredibly accurate. If you purchase a high end product where the manufacturer holds your hand then you’re never going to learn anything for yourself. I could have blown $3000 for a similar laser cutter made in the USA and it would have the same abilities. It might have better software and support and it might have shown up without misaligned mirrors. While I certainly value my time, the six to seven hours I spent tweaking this laser cutter to perfection have saved me up to $2500 on a better model. If you’re like me, you don’t make $2500 in a day at work so it’s worth a few headaches. If this one breaks, (I mean WHEN this one breaks) I will have the skill set to repair it or I may just buy a more powerful one. I’m overall very happy with this and I hope to use it for many of my personal projects and inventions. If you’re on the fence about buying one I recommend it as a great starter model to get your feet wet.
I hope I’ve helped you in some way. Feel free to leave a comment or ask a question.
-Richard Grisafi

I purchased one of these for £370.00 GBP. Very pleased with most of it. After reading this blog and other stuff on the net I fully expected to have to set it up so wasn’t that upset when I found I did indeed need to reposition every mirror… What an irksome job that is.. If I do it again I’ll make a visible red laser holder to fit in where the lens is and use this to set up all the mirrors.. However thanks for the blog and the details . It mad me expect the work I had to do to get it working well. I haven’t managed to cut 5.5mm Ply yet and that was one of the things I really wanted to however I haven’t even tried to adjust the focus yet so maybe it just needs focusing…
at present I don’t run it faster than 120mm/s as the whole thing shakes too much
8mm/s at 6ma (indicating on scale) does 2mm acrylic 4mm felt.
100mm/s at 6ma does a nice job cutting paper or thin card
full power 5mm/s doesn’t penetrate 5.5mm ply… 🙂
Thanks again fella…
LikeLike
Hi,
My apologies for the late response. It seems like any time I respond to five comments I immediately have ten more.
I’m glad I could help you get up and running. I’m not sure you’re going to be able to cut 5.5mm (0.21″) plywood very well. Even 3mm may give you a hard time. It’s likely possible to cut 5.5mm in two or three passes but I tend to doubt you’re going to make it happen in one pass with a 40W laser.
Let me know how everything works out and best of luck to you.
-Rich
LikeLike
4 or 5 passes and 6ma 8mm/s seems to get through the ply wood.
I’ve ordered a 38.1mm focal length lens (instead of the 50 odd I have as standard) and a better quality bigger mirror on the head. I’m hoping this will give me a better cut of the ply and hoping the reduction in depth of cut wont be too great. I’ve also ordered the bits for air assist and I’ve set up a red visible laser cross hairs sight. So hopefully I’m going to give this little laser the best chance it’s got of cutting the ply in less passes (quicker) . I have a problem though that during a cut I’ll hear a sound like high voltage discharge and the mA’s will jump up by a couple of mA. I’m guessing this is some insulation breaking down somewhere and my be the end of my laser if it gets worse. I’ve contacted the seller (as it’s only a few weeks old) and they are looking in to it.
Corel laser is giving me problems . I can’t import any sort of graphic be it Jpeg, bmp , png etc it crashes the programme. I’m running it on Win 7 and it appears it is the XP version but running in compatibility mode still doesn’t fix it.
A quick question, Do you know how to do multi passes in corel laser without it asking for permission every iteration ?
As an add on I’d like to extend the rails on my laser and make it an A3 bed rather than the less than A4 one it is now..
Great Blog Thanks
LikeLike
Hi Again,
Corel Laser is meant for vector art. A JPG/BMP/PNG are all raster formats. If Corel Laser is giving you problems my suggestion would be to import your file into Corel Draw, Adobe Illustrator, or Inkscape (Free Option) and then just export it as an SVG. Corel Laser is certainly not high-end software and my expectations from it are low.
The multi pass issue was giving me problems as well because there were times when I wanted to do several passes without going back to my laptop. To fix it I just copied the path that I wanted to cut twice and pasted it right back down in the same place. Corel Laser doesn’t seem to consider this and just treats it like two lines even though they are in the same place. Make sure you select “Single Pass” otherwise you will get four cuts.
It’s probably easier to just build a new laser cutter from scratch then it would be to modify this one but I’d love to see it if you pulled it off.
Let me know if you have any more problems with the high voltage discharge. I’m interested to know how it works out.
-Rich
LikeLike
Hi awesome write up
In regards to the ground lead in the back? How exactly is that supposed to be wired? I’ve been searching and no one really mentions that part or the setup. Your response would be greatly appreciated.
If you could email me at cosejastellon@gmail.com with your response. Thank you very much
LikeLike
Hi,
I just bought such a 40W-Laser and generally it works fine so far.
But sometimes I have the same problem with the high voltage discharge. It sounds like tssssssss-grrr-grrrrrr-grrrrrrrr-tsssssssssss 😉 while cutting, the ammeter shakes and the cut is not perfect when it occurs.
Do you have already a solution?
Carsten
LikeLike
Hello Carsten,
My apologies for the late response.
Another one of the commenters was complaining of an arcing noise. I’ve personally never experienced this but I can assure you it is not normal. My guess is that there is something wrong with either the power supply or the laser tube itself. At the moment I can’t think of any way to determine which could be your problem. I would check to tube for cracks and look into the power supply to see if there is anything obviously wrong with it. Wish I could be more help.
Thanks so much for reading and let us know how it works out so you can potentially help others.
-Rich
LikeLike
Here is a short video, that shows the problem:
LikeLike
Hi Richard,
I want to thank you so much for writing such thorough guide. I have ordered mine several days ago and expecting it to get it tomorrow. So far I have watched many many videos on youtube and read a number of great blogs about how to modify and make this a better machine.
But, The SAFETY Tips you have given here are just Great! I mean I can not thank you enough for it. First think I am going to purchase tomorrow is a small fire extinguisher and I have already ordered Safety Goggles for both me n wife. Hey you can only get blind once :P. Also will definitely do some research before cutting/etching any material other than wood, acrylic etc.
Have not read all the comments yet, so for now I am keeping the question to myself. But if something doesn’t add up, I will post it here.
Once again those safety tips are such a great addition to my knowledge about this laser cutter, that I feel more confident now.
-Chirag Chaudhari
ScratchBuilds.com
LikeLike
Hi Chirag,
Thanks so much for reading and I’m glad I’ve been able to help you in some way.
I hope you’re able to get this up and running with minimal effort (and some luck). If you end up with any questions then feel free to post them here.
Always be safe and best of luck.
-Rich
LikeLike
What frequency goggles did you get please ?
Regards
Rudi
Rudolf@industelect.com.au
LikeLike
Hi Rudi,
Do you mean wavelength? I believe it’s 10,600nm. Just search for CO2 Laser Safety Goggles.
Here is a link.
Amazon – LASER SAFETY EYEWEAR
-Rich
LikeLike
Hi there, thanks for the post, i wrote a comment a few weeks ago but maybe it got lost.
i have the same machine but to cut acrylic (3mm) it needs to be set on a 2mm/sec speed which is really low, and with this speed it wont cut all the way trhough, i also tried to cut 3mm wood (mdf) but it didnt cut it either, is this normal? do u know what the problema might be? even though the machine is new, should i change the laser? thanks!
LikeLike
Hi Nicolas,
My apologies for the late response. I sometimes receive too many comments and get slightly overwhelmed.
Personally I have no problem cutting most 1/8″ (3mm) acrylics at 8mm/s and 25% power. There is one particular acrylic that gives me a problem if I don’t cut at 5mm/s. 2mm/s in my opinion should be greatly overkill and have no problem cutting through any 3mm acrylic.
There are probably a lot of things that would cause this but I’ll try to hit what I think is the most likely. Misaligned mirrors or out of focus lens would be my first guess. When I first tried to cut something even at slow speeds I could only cut halfway into the material and only for a short distance before the cut depth would trail off entirely. My next guess would that the potentiometer on the front panel is providing too much resistance and restricting the laser. If you can see the Ammeter needle spiking to several mA during operation then you can be sure it’s working. Next check the laser for cracks. Otherwise it’s potentially the power supply.
If you were able to figure this out please let us know for the benefit of everyone else reading. Thanks so much for reading and best of luck.
-Rich
LikeLike
Agree with Rich. I cut 2mm often with no problem at all and I’ve cut 4mm by taking it a little slower so 3mm should be fine. I haven’t tried 3mm MDF but 5.5mm Ply wood takes a few passes (4 or 5) to get through at 8mm/s 6Ma so I would have thought the MDF would be do able..
LikeLike
Hi there,
thanks for the blog – good source of information.
I haven’t found anything on a continuous laser beam issue.
Namely, as soon as I hit the switch button, the laser beam is on and never stops from that moment on – engraving a continuous burnt mark wherever the head goes.
Any ideas on how to fix it?
Thanks!
Nenad
LikeLike
Hi Nenad,
Thanks for reading and my apologies for the somewhat late response. I hope by now you’ve solved your own problem but I’ve responded in hopes to maybe help others with the same problem.
I can tell you that this is not normal and you should not be using your laser cutter until this is fixed. There are a couple of things that could be causing this. The “Test” switch located on the front panel could be stuck closed. My next guess would be to check the relay (or triac) directly controlling the laser.
If that’s not the culprit you can always upgrade to a DSP Controller and replace all the electronics. Expensive option but you’ll likely be happy with the upgrade.
I hope I’ve been able to help a little bit. Thanks so much for reading and best of luck.
-Rich
LikeLike
Thank you very much for this. I Just purchased mine and I’m waiting for delivery. You saved me a lot of puzzlement and I now have a list of things to have available when the unit arrives. Obvious in retrospect, but I had not actually made my list:
Safety goggles
lens wipes
alignment tape
bucket
distilled water
test material
fire extinguisher
water bath (for small fires)
LikeLike
Hi Dan,
I’m glad I could help. I wish someone had told me to have those in advance because they resulted in overnight shipping or late night trips to the store.
If you have any questions please don’t hesitate to post them here. Thanks for reading and best of luck.
-Rich
LikeLike
I can’t resist looking at the cut operation as it does it. 🙂 . If I had to rely on glasses then it would only be a matter of time before I forgot to put them on or had the wrong ones on and looked at the laser cutting away. So in my opinion glasses are not a suitable hazard control measure unless the absolute last resort.
I could be very wrong but as the damage to the eye is caused by heat (the eye has particularly poor cooling) the orange window on top of the cutter does offer protection from stray bounces of the laser. The laser would have to burn through that before damaging your eyes. This is only my thoughts so please don’t take it as fact. However as I like to err on the side of safety and I know I can’t resist looking, I’ve taped a web cam on top of the lid looking through the window . I can view this on my PC and that way any nosey parkers (mainly me) like the kids or the wife can watch it to their heart content without any fear of injury. Follow this up by blanking off the window with a bit of metal and a switch on the door to knock the laser off if opened and that’s a right proper control measure again IMO. Cheap to probably a lot cheaper than two sets of glasses.
As for fire, I have an extinguisher handy but my eventual intention is to use a Co2 bottle (pub gas or welding gas) with a regulator and valve and pipe it in to the enclosure. Again my view is if something goes on fire you don’t want to be opening the lid (with laser potentially still on) and grabbing burning stuff to dunk in water nor do you really want to fire extinguisher’s in to the enclosure and knock out the mirror alignment or cause other damage etc. Of course using a fire extinguisher is far far preferable to burning the house down but a simple opening of the Co2 valve will flood the enclosure with Co2 and put the fire out with no mess and no additional risk. You could potentially carry on cutting whilst putting it out if you so wished..
LikeLike
Hi again,
I have to admit I find it difficult to resist watching the laser myself. When you work hard on a project and you have to entrust it to a machine it makes you want to watch it. The cover likely protects your eyes but I wouldn’t really bet on it. The webcam idea is pretty much ideal because you can watch for fires and you’re not risking your eyes.
CO2 may choke the fire but I’d probably prefer a fire extinguisher. You can likely use a powder variety (Dry Chemical) if you’re concerned about damaging electronics. The powder is non conductive although admittedly it will make a pretty large mess. I’ve yet to have an issue with the “flaming-project-to-sink-run” but I have a fire extinguisher handy just in case.
Thanks again for reading.
-Rich
LikeLike
A simple but effective idea to overlay the same thing over each other to get multi passes ..thanks for that Rich..
An update on my problem..
As a re cap if I’m cutting something be it low power low speed or higher power higher speed the mA meter will flick up and an arcing noise is heard.
So with the cutter at 4mA it will flick up to 6mA or more accompanied but the noise of frying eggs. The manufacturers tell me this is normal and not to worry. I don’t believe this for a minute but would like to check with you if your ammeter fluctuates at all during a cut ? or indeed does the sound change. I don’t mean the sing of the steppers as obviously they changes constantly but in the back ground a HV discharge sound… Thanks…l
LikeLike
Two weeks ago i ordered this lasercutter on ebay and last week it has arrived.
After first tests with the laser engraver, i have the same problem.
The power of the lasertube is changing often irregular while cutting or engraving. In addition to this there is a different, arcing noise, it sounds like high voltage discharging too in the electronic-box for controlling the lasertube in the bottom of the machine. This problem mainly occurs in that moment, when the lasertube is switched on and off while cutting or engraving.
The cut is then of a very bad quality. If the problem doesn´t appears, the cut is OK. So i guess, that there is a failure.
Is it right, that other machines don´t make this arcing noise?
Carsten
LikeLike
Some basic electronics knowledge;
The manufacturer is correct. The noises you are hearing at low current settings (<4ma) are coming from the lasers high voltage power supply. It is normal. (technically, the power supply uses a high frequency switching design and the internal magnetics (ie. transformers/inductors) actually emit this sound due to vibration. It is not arcing and not of any concern. About the ammeter; The laser requires a minimum current to activate the lasing. The range from (0 to somewhere around 4ma) may not lase at all due to not enough current. As you approach the 5ma zone you hear that squeaky sound get quieter and eventually your current setting will be enough for the tube to lase. Remember, the laser fires as pulses of on/off at very high speed. The analog ammeter is mechanically too slow to respond to these pulses, so you are seeing an average current reading. When cutting, the laser is on/firing for longer periods of time and the ammeter appears to be steady, and shows a more steady current reading. To get the most accurate current reading, simply test fire the laser (using the button) and hold it until the meter needle becomes steady.
LikeLike
Hello Bob,
I’m not really sure what you’re trying to say. I don’t need “basic electronics” knowledge and the manufacturer didn’t say anything at all. I don’t hear any noises other than the stepper motors moving. Hearing an arcing sound as another reader claimed is obviously not normal.
When engraving text or other details I can say that the needle moves up to about 1mA and sort of vibrates around in that area. When cutting the needle spikes up to over 5mA and quickly recedes. Both of these seem like logical behaviors to me. I can’t say I recommend holding down the test button. This can start a fire very quickly if you have material under the laser and it will leave marks on the cutting bed if not.
I agree that the Ammeter isn’t providing very useful readings but it’s proof that there is variable amount of current going to the laser.
-Rich
LikeLike
Yes that was me that may or may not need basic electronics understanding I must have forgotten my basics since designing them as a job some 20 to 30 years ago. First my apologies for keep confusing 4ma (as in a 4-20ma thing I’m playing with at the moment) and 6mA which is the indicated current I do most of my cutting with. I set up a test cut that basically draws a square and then another slightly smaller etc.. The laser is nicely lasing at 6mA for maybe one or two squares then arcs and shoots up by 2 or 3 Ma then back to stable . It is a really random pattern of arc / stable. Just to see if you were right bob I turned the thing up to near max and did the same test… if anything it was worse not better..
LikeLike
Hi Again,
I wouldn’t worry too much about what the gauge is reading. If it cuts well it should be good enough. I never really even knew the typical values until I responded to commenters from this post. That’s when I started to take notice of what the gauge was reading. It will be high for cutting and low for engraving and that’s all the average person really needs to know until something goes wrong.
Best of luck with the laser cutter and feel free to post questions here if you have any.
-Rich
LikeLike
Hi Richard
Thank you for the writing n sharing, it helps alot.
I read some passages that recommend drying the machine after using every time. Do you think it is needed. Which part I need to dry it, so I need to clean the bucket every time I use it, do you think so?
Thank you for reading my comment.
Mocha
LikeLike
Hello Mocha,
I’m not sure who told you that this has to be dried but other than the water cooling system this should NEVER see water.
I use distilled water in my cooling system and it seems to stay clear of mold/bacteria so I admittedly have never cleaned it. I recommend you do the same and use distilled water. It will evaporate before it ever needs to be changed.
It’s just to cool the laser and as long as the water can flow smoothly and there are no clogs then you will have nothing to worry about.
Let me know if you have any more questions and thanks for reading. Best of luck.
-Rich
LikeLike
What is it like for cutting paper? I’m thinking of getting one to do mainly paper crafts with paper, thin card stocks etc. some of the videos I’ve seen on youtube of these laser cutters look like they leave burn marks along the edge of the cut when cutting paper.
LikeLike
Hi Dave,
I’ve attached an image of what it looks like when you laser cut white card stock. You can see the very faint burn marks although it’s not easily seen unless you’re looking for it. Overall I would say it’s very fast and effective at cutting paper or cardboard but you will have to run the cutter at high speed and low power to avoid fires and excessive burning. The cut in the image took just a few seconds.
If you are going to use the laser cutter for multiple materials then I recommend it fully. If you only plan on cutting paper or vinyl then my recommendation would be to get either a Brother Scan n Cut or one of the offerings from Cricut depending on your specific needs. Those two will leave no burn marks and they’re highly precise and effective at a lower cost. Additionally they are both consumer oriented products backed by major manufacturers with a good reputation.
Let me know if you have any more questions. Thanks so much for reading and have a great day.
-Rich
LikeLike
Thanks for the reply. We already have a craft cutter but they’re terribly slow and not very good for more intricate designs, plus the requirement of the carrier sheets is a headache and an expensive consumable.
So that’s why I was thinking of using a laser engraver, plus if we had one I’m sure I’d find 100’s of other things projects that I’d want to have a stab at with an engraver.
LikeLike
Maybe air assist would help ? I find I can’t go fast enough as the whole thing shakes and can’t go low enough with the laser power to cut thin paper without burning marks.. Thicker paper and card isn’t a problem. I’ll give it another go when I get my air assist and report back as I think most of the brown deposit is from the smoke and this should be vastly reduced with air assist.
LikeLike
Hi Richard,
thanks for this blog. I am also a proud owner of a K40W laser. My problem was that the laser doesn’t have “enough power” to engrave. I checked lenses alignment, cleaned them and still, the engraving would just leave faint marks on the 20 mm wood (pine). Then, I tried a 3mm balsa wood, and the result & performance were quite good.
It figures that the vertical (z axis) working distance between the piece of wood and the laser output has been set to engrave/cut thin pieces (e.g. up to 3mm). Using 20 mm thick piece meant that the laser focus was approx. 20 mm out of its optimal position.
As I am usually using 20 mm thick wood, I would like to lower the laser bed 20mm downwards. Any ideas/suggestions on how to do it the easiest way?
Thanks.
LikeLike
Raising the laser head isn’t easy so really you only have two options,
1, Is to lower the work piece either through the hole in the bed or by cutting some of the bed out to fit it lower down.
2, change the Lens for one with a shorter focal length.
My laser came with a 50 something mm lens set up. I’m upgrading my laser to air assist so whilst at it I’m changing the lens to a 38 something mm..
The unknown to me is that though the 38mm is closer to your required height and as the FL gets shorter the spot size gets smaller (more power per M^2) but the divergence gets bigger so may not help at all. I’m guessing this will be closer to what you need but without testing it I don’t know.
I’m still waiting for my new lens etc to turn up so when it does I can do an experiment for you if you still need it… Evidently my lens is with customs at them moment and they want £25 to release it !!!!
I hope you don’t mind me chipping in Richard, It is your blog of course….
LikeLike
Hi Again,
By all means feel free to respond to others. I would have to spend a few hours per week if I had to respond to everyone by myself. While I pride myself on knowing a lot about this laser cutter I don’t feel that I know everything and it’s always good to see another perspective. This is especially true on projects I’ve never worked on.
Thanks so much.
-Rich
LikeLiked by 1 person
Hi,
Just reading your blog. I’ve had my K40 for a few weeks now and was getting frustrated at the poor cutting and engraving results (my wife told me to buy an Epilog, but I couldn’t justify the extra expense, and what would I have to fiddle with!), so at the weekend I spent a couple of hours making a simple height adjustable bed. I used used some Aluminium Box section superglued some M6 nuts over some holes and put in some M6 bolts with a bit of rubber on top to give me some height adjustment, this just sits on the bottom of the unit. One word of advice though if you’re trying to measure 50mm (assuming 50mmfl lens) cut a simple piece of material to the correct distance and check all 4 corners, I found my X rail was almost 5mm out from one end to the other, so rather than take the rails to bits to try and realign, I’ve adjusted the bed to suit the error. I’ve gone from 4 passes at around 6mA to 1 pass at 6mA in 3mm ply for cutting and the line thickness has reduced dramatically.
Don’t assume the case is square for your measurement as if it’s anything like mine it’s a good 10mm out of square.
Cheers for the webpage it’s probably the most useful one so far.
Sean
LikeLike
Hi Sean,
Thanks for the kind words and sorry for the late response. This was definitely a better buy than the Epilog. The Epilog is a nice machine but I agree it’s not worth the extra money.
Nice work on the adjustable bed. I’d love to see it.
-Rich
LikeLike
Hi Nenad,
Honestly I don’t feel this laser cutter is good for engraving 20mm wood. The bed height is not easily adjustable and the stock lens is out of focus. Without doing the math to prove this I would hypothesize that a thicker material can transfer more of the laser energy rather than absorb it as a thinner material would. Your best bet would be to change the laser to one with a closer focal point. If you can fit the work piece into the rectangular cutout of the bed then just cut it at that height without any other change.
Best of luck with this but your probably better off with a CNC Router if you’d like to engrave wood. Let me know how it turns out. Thanks.
-Rich
LikeLike
Hi Rich,
thanks for the reply. perfectgukhotmailcom suggested to try a different lens. I measured distance between lens and the bed, and it is around 45mm. That means that I’d need 25 mm lens to engrave 20 mm wood I guess. Just asked whether I’d need to change the head as well to be able to fit new lens.
Also, my pieces are usually 200-300 mm long and 200 mm wide. They cannot fit in the clamped hole. I was thinking of removing the bed and putting just a perforated aluminium sheet. Also, I’d be cutting 15-20 mm of the exhaust as it sits directly on the laser path – therefore I always need to put 15 mm margin on whatever I work at. Did you try to dismantle the bed, what is the best way to do it and would I need to remove the sliders on which the laser head runs as well?
Thanks and Merry Christmas.
LikeLike
Merry Christmas to you all as well…
You are right in your calcs but whilst you may be able to get lenses of any focal point but I’ve only seen a few for this laser and 38.1 mm is the closest and something like 150mm is the furthest. So I haven’t seen a 20mm focal length one. This is why I wasn’t sure it would help you 38.1 is a lot closer to the distance you want and the spot size will be smaller so at 38.1mm but due to an increase in divergence you may not be any better off.
http://www.parallax-tech.com/faq.htm
look at this site for an explanation of the focal length vs spot and divergence. I don’t know if they come in different thread sizes ,sorry.
I’ve ordered a complete set up (lens/mirror) so that I can swap easily between the two. I’ve started with a new mirror and lens to prevent any possible smoke damage on the old set up interfering with my tests of the new one. The 18mm mirror in the old one wouldn’t fit the new head anyway though I could have got an air assist head with the 18mm mirror. Yep you will need a compressor and piping and probably a valve or some way of turning it off when not cutting..
LikeLike
Hi thanks for the reply.
Different lens would work, but how to determine which one? Does it mean that the (e.g.) 38 mm lens would require the working piece to be at 38 mm from it? Then, what if I want to work with different thickness materials?
I guess I would be more comfortable by mechanically lowering the bed (or changing it all together and lowering) – it can be fixed, but not sure whether that is a straight forward task or I’d need to disassemble the whole lot spending days tinkering with it?
Cheers,
Nenad
LikeLike
Yes the 38 mm means the smallest spot size and thus the best cutting distance is 38mm form the lens. It is easier to raise something by putting packers underneath than it is to lower it as this means cutting hole in the deck. In mine there is hole in the middle of the deck already with a spring clamp thing but it is only small and thus not much help.
I cut 6mm ply or paper with out adjusting the height of mine (i.e. using the standard bed height) so the divergence can’t be that great on the 50mm lens. If you do a lot of different sizes and constantly change from one to the other then a Z axis would be the answer but it is a lot of work if not needed.
LikeLike
I got some new ply wood the other day and though it is only 4mm it takes a lot more cutting than the 6mm I’ve been using lately. 6mm take five passes at 6mA and 8mm/s The 4mm stuff took 6 passes and even then wasn’t as neat as the 6mm so could do with 7 passes really. Just goes to show that all ply is not equal depending on glue and wood types used in construction.
LikeLike
Thanks. Where did you buy your 38 mm lens from, what type/kind/brand is suitable for this laser, how much does it cost in average, and how easy is to change it? Also, how would I identify the type and size of mu current lens? Cheers.
LikeLike
http://www.lightobject.com/18mm-Laser-head-w-air-assisted-Ideal-for-K40-machine-P701.aspx
Shipment 1 of 1
Ship From:
LIGHTOBJECT
21 Blue Sky Ct.
Suite A
SACRAMENTO, CA 95828
UNITED STATES Ship To:
Shipment Method:
USPS Priority Mail International Small Flat Rate Box (8″x3″x1″)
Shipment Status:
Shipped
Tracking Information:
SKU Description Quantity Price
LSR-MIR20MSI 20mm High quality Si Plated Reflection Mirror 1 $28.50
LSR-LH1820B 18mm Laser head w/ air assisted. Ideal for K40 machine 1 $16.50
LSR-ZNSE1838HQ High quality 18mm ZnSe Focus lens (F38.1mm) 1 $52.00
Order Totals
Subtotal: $97.00 Thanks again for shopping with us!
Lightobject
Tax: $0.00
Shipping and Handling: $31.50
Discounts: $0.00
Total: $128.50
LikeLike
Thanks for that. All the info I might need 🙂 I’ve noticed that you purchased also the Reflection Mirror – is that because the new lens wouldn’t fit into the existing head (i.e. because of the new lens you’d have to change the complete head)?
I also noticed the air assist head – I presume you’d have to purchase a small compressor and install the plumbing for the air?
I am surprised you have been charged extra 25 Pounds by UK customs. That hurts. I’d say Australian customs is more forgiving.
Merry Christmas,
Nenad
LikeLike
If you measure the distance between the bottom of the lens carrier and the bed of your laser you should have a good idea of what lens you have as there aren’t that many variations and they are quite a step apart in distance. If you want to be really smarty then have your laser cut a line on a sloped bit of ply and try and see where it cuts the thinnest (or deepest) then you’ll know the actual distance and the divergence..
LikeLike
Ah, yes, that is a smart suggestion (re cutting on the slope). In the meantime, I have unscrewed the head (it is a simple thing to do, I am a bit surprised :). The head contains the mirror and the lens sits at the bottom of it. Distance between the lens and the bed (I think I have the same one as you described – one with the hole and sort of a clamp on it) is approx. 45 mm. That means that I would need a 45-20=25-ish mm lens to engrave a 20 mm thick wood, right? I presume I’d need to buy a new head as well as the new lens (which comes in a metal case that screws directly into the head) might have a different thread so it might not be able to fit into the existing head. IS that right, or how does it actually work?
Thanks.
LikeLike
Merry Christmas to you all as well…
I’m not quite sure why this reply appears further up in the posts as well ??
You are right in your calcs but whilst you may be able to get lenses of any focal point but I’ve only seen a few for this laser and 38.1 mm is the closest and something like 150mm is the furthest. So I haven’t seen a 20mm focal length one. This is why I wasn’t sure it would help you 38.1 is a lot closer to the distance you want and the spot size will be smaller so at 38.1mm but due to an increase in divergence you may not be any better off.
http://www.parallax-tech.com/faq.htm
look at this site for an explanation of the focal length vs spot and divergence. I don’t know if they come in different thread sizes ,sorry.
I’ve ordered a complete set up (lens/mirror) so that I can swap easily between the two. I’ve started with a new mirror and lens to prevent any possible smoke damage on the old set up interfering with my tests of the new one. The 18mm mirror in the old one wouldn’t fit the new head anyway though I could have got an air assist head with the 18mm mirror. Yep you will need a compressor and piping and probably a valve or some way of turning it off when not cutting..
LikeLike
Hi Richard, nice blog.
I was wondering whether it was worth buying a cheap laser cutter to learn before I potentially invest in a more expensive one. I’d just like to ask, do you have any samples of photo engravings? I’m curious as to whether this can decently engrave photos to acrylic or aluminium.
Thanks.
LikeLike
Hi,
This is absolutely worth it to try out. It’s better than purchasing a $3000 shiny laser with good documentation that barely provides any other advantage.
As for engraving photos it’s certainly possible but your image will need to be Dithered, Stippled, or TSP’ed to convert it from a raster type image to a vector type image. Since you can’t cut in color you’ll have to get creative to make images look good.
There’s a great article here
You’re likely not going to get a good engraving out of Aluminum but admittedly I’ve never tried it. Let me know if you have any more questions and best of luck.
-Rich
LikeLike
Thanks for the explanation and link. Considering all I think I would be better off by keeping the existing lens and lowering the bed (to a fixed height, using pads when needed to raise the working piece).
I was looking the interior – it seems that the sliders (where the y mirror and x mirror/lens slide on) are not connected to the bed – but rather have their own fixings. It looks like the bed has been fixed by only 8 screws. Removing it, cutting the legs it stands on and replacing it with perforated aluminium sheet shouldn’t be a big issue. Do you have any experience with it at all?
Cheers,
Nenad
LikeLike
I haven’t got any experience taking out or modify the bed. It would be a very handy thing for you to make a you tube video or something if you are going to do it though as I bet it is something a lot of folks would like to do.. However I have got a handy hint for you. Get a couple of cheapo laser diodes from ebay (£1 each or similar) . Accurately measure the focal point distance and put a surface at this distance. Fire the laser to make a mark. Stick or otherwise fix the two lasers to the laser head with one on each side. Aim the lasers at the mark you’ve just made. Now you have a visual way of setting the height. Once you’ve removed the bed then you can move the surface of your work pieces up and down until the two laser dots coincide again and know it’s at the correct height. You could also use line generating lasers if you want to give you a nice visual effect. When you can see one lien it’s set at the right height two lines and it need adjustment. Throw in another line generating laser at 90 degrees from the others and have a cross hair sight to align the work piece as well..
LikeLike
Hello! I like this site, very helpful. I have a question for you knowledgeable folk. I was doing a cut with my k40 laser, when I checked on it, the laser was not firing (but the head was still following it’s instructions) after stopping I looked at the tube and it had broke. I replaced the tube just today, and I’m pretty darn sure the contacts are correctly attached *looked all over for how to do that * and I believe I attached them well… Anyway I’m still seeing no power or “firing”from the laser. The little meter on the front panel shows no signs of life, and the laser “test” and switch buttons don’t seem to do anything either. I checked fuses and nothing shows any sign of damage. Any idea what I should try next? I appreciate your help!
-zeep
LikeLike
Hi Zeep,
Are you 100% sure it was the laser tube that was your problem? It could have been some other issue with your power supply breaking the laser. If you have one of the models where the power supply is powering the water pump that would certainly explain everything also.
I’m not sure what to tell you about the contacts other than I probably would have taken pictures of the old contacts before removing them and plugging them into the new laser tube. You likely did this correctly but my guess is that you have some other issue going on.
And I wouldn’t discount the fact that your new laser could be defective as well. It’s likely from the same factory that produced our lasers and likely has the same quality standards (or lack thereof).
Anyone else feel free to chime in here as I’ve never removed the tube before.
Best of luck and let everyone know how you fixed it if you manage to do so. Thanks for reading.
-Rich
LikeLike
I know this may seem like a dumb question, but what kind of safety googles are the proper goggles for the CO2 laser?
LikeLike
Hi Ruth,
Not a dumb question at all. CO2 Laser Safety Goggles. Here is a link.
Amazon – LASER SAFETY EYEWEAR
Thanks for reading and let me know if you have any other questions.
-Rich
LikeLike
Ok, good idea – If I decide to do it, I’ll document it one way or another. To be honest, I’ve spent more time recently reading about Tortec and Universal lasers, than contemplating on how to change the bed on K40 🙂
Happy New Year!
Cheers,
Nenad
LikeLike
There seems to be a healthy step up in price from our K40 derivatives and the next level up. I haven’t used any of the more expensive ones but full imagine machines like the epilog and some of the ones you mentioned above are streets ahead of the K40. They will have already sorted out all the niggles. The laser wont necessarily do any more though but getting it to do stuff is probably easier. If you are going to use a laser cutter seriously and want a well oiled machine (and can afford it) then I would agree you probably should look else where than the K40. The K40 is for fiddlers and unless heavily upgraded wont touch the big boys for ease of use.
Happy new year to you all
LikeLike
I just got my K40-ish machine up and running. I call it X40 because it comes preupgraded, tuned and 95% ready to go. Still limited to Lihuiyu software, but after some small adjustments of LaserDRW, its cutting and engraving far beyond my expectations. I did write a rather long post here that may be lost somewhere, but very short, my “X40” might just be the step up from K40 without going after the “big ones”. I know I might be overly optimistic, but so far so god, and the unboxing and first run is up on youtube: https://www.youtube.com/watch?v=sBz4f9jlx6c (first run).
LikeLike
You are right, they are approx. 40-50 times more expensive than K40 (a bit bigger working area though). I have been using K40 for a while to see what can be done using lasers in general. I am still using it for the business but am finding lots of limitations. I need a reliable, long-lasting, fast and accurate machine. K40 is not quite fitting the description. Between Epilog, Trotec and Universal I am leaning towards the Universal machines (haven’t made final decision as yet) as it seems that they have the least expensive parts, and most of the parts change and maintenance can be done by oneself (they have been designed that way – apparently).
Cheers,
Nenad
LikeLike
… However, to be fair – despite all of its drawbacks K40 can still do some great work on a smaller scale (otherwise I wouldn’t be able to use for the business). I guess if one is handy, has time and patience to invest into it, and if it is using it sparingly, the K40 can be of a good assistance. Cheers, Nenad
LikeLike
Just wanted to thank you for this little review. I recently got myself a “High Precise” 2030 / K40-type laser from China / eBay, that has many updates / upgrades allready installed that I think is interresting.
1: My unit has an adjustable (up/down) bed. One simply turns a Hex screw (with a supplied hex wrench) to raise or lower the entire bed, and that makes engraving and cutting variable pieces very simple.
2: My laser came with sort of a red acrylic 50.6mm by 19.92mm measuring device that is marked “focusing scale, meas 50.8mm”.
In a video supplied along with the laserDRW aso software, this thing is used by laying it under the lens-holder to measure (some) 20mm from under the holder to the workpiece. I found it kond of strange as I thought the distance should be more like 38mm, but I have had no trouble engraving or cutting so far. Will try to do the sloped test you mention to see what depths and presicion I get.
3: My unit actually has double ball-bearing sliding (hardened) rails on both left and right sides on the “in and out” axis (would that be Y-axis?) and not the single bearing slider on the left hand side and an angled metal slide path on the right hand side as the “original K40”. I never tried the original K40, but this double sliders-setup seems very accurate and I have seen it on larger machines (x700 redsail?).
4: The “Left to right-axis” (maybe X-axis?) is not a rail like the old K40 for the head assy to roll along, but rather a solid “slidebearing” made in Germany (it says at least). Very stable. No little wheels between it and head.
5: My unit has a fan-cooled PSU and what looks like a new MB. Auction brags about it being better and that PSU is more stable and can handle loads better than previous versions. MB / Controller card is marked: “M2 NANO – NANO JULONG – 2015 – 08 -15” amoung other things. Same Lihuiyu labs as yours (same dongle, but dongle is branded “2015.01.15”).
6: All cables, wires and hoses going to heas and movable mirror (both axes) are entirely enclosed in chain-linked plastic belt-things.
7: My unit has preinstalled blower nozzle and a red dot laser pointer that indicates burning laser path.
8: My units enclosure is front-vented. Meaning it has 12 100mm long, 7mm wide slots cut in the front of main lid at an angle allowing air to be drawn from front to back. Entire enclosire stands on 100mm legs.
9: Unit has “emergency stop” button, AND a keyed power switch plus an on / off button.
10: Cutting compartment has a round LED-light illuminating the cutting space.
11: Unit has preinstalled temperature sensor wired to a LCD on the top showing water temperature on the silicone cooling hose going to the laser tube. Sensor is located some 200mm from the tube.
I had to align the mirrors, but the brass set-screws have locking screws on them. This makes them kind of hard to screw in and out (mostly because they are really hard to get to), but once set they are locked. I actually was surprised I only spent 5-10 minutes aligning after watching the supplied video of how to set up the machine. I find it kind of weird there are only three adjustable screws on each mirror (one lower corner lacks screw / screwhole completely for each mirror) but to my surprise this wasnt a problem.
The second morror on mine was very dirty when the unit came. I have no idea why, but someone must have burnt something after the first mirror (ie in the cutting chamber). Lens and the other mirrors was clean. I hope the dirt was from some factory testing. Water was still inside silicone cooling tubes, but was not making any mess. No QA-stamps. No ISO-markings, but I have found no faulty wiring or loose parts inside or out. I guess my concerns after seing the banged-up shipping crate (plywood) was wrong.
I have no previous experience with this kind of machines, but it has done what i expect of it and more. Probably mostly because my expectations were very low to begin with 🙂
There is one little big thing I would love to have advice on from you or your readers, and that is the amp-settings. My unit has a digital readout panel that is adjustable in percental increments. There are three up / down adjustments on this, and they are labelled 0.1% (up / down), 1% (up / down) and 10% (up / down). The LCD display was showing “20” when i first powered it on, and it adjusts as expected by increments of 10, 1 or 0.1 based on whatever pair of adjustment buttons i press. The adjustment pairs are called ” Current regulator”, and the LCD display is labelled “Ampere meter”.
LCD can be set to 0 – 100. I have seen other reviews calling this “percentage”, but I guess I find it hard to grasp how I am supposed to relate to percentages of some Ampere value that I dont know, and understand that the thing would not like 100Amps of any kind, so I have opted on the safe side and am handling this number as indicative of mAmps. If I set it to “7” or less, the laser does not leave a mark on anything. I have gone up to “20” and it cuts straight through 1mm acrylic at 15mm/sec. To me this could look like the LCD kind of displays milliamps? At least not amps or percentage of some mAmp max? Would that be a fair guess? And where would it be best to measure mA with a multimeter to see what it says vs what the LCD on the unit says?
Thank you again. I bought this little thing for 650 USD (plus shipping). I have done a kind of unboxing on youtube (https://www.youtube.com/watch?v=4uTyU64-ZXo) and here is the link to the eBay-page: http://www.ebay.com/itm/201485085366?_trksid=p2057872.m2749.l2649, and I am planning to do some reviewing once I fully understand it 🙂
LikeLike
Hi Claus,
I admittedly had to take a few days to read your entire comment. (It was long). I appreciate the talking points and it seems like you got a really nice version of this machine. I have essentially none of the “bells and whistles” that you do.
To answer your question I typically set my power to about 25% although I’ll crank it up to 50% if I’m having problems. I’ve never taken it to 100% and I have only tried taking it to about 75%. There is no scale on my dial so these are ultimately just estimates. With the exception of one particular acrylic (Black 1/8″ [3mm]) I’ve had no problem cutting anything I’ve attempted since aligning the mirrors.
I suppose I wouldn’t worry about the actual current unless something is broken. Just set it low and raise it to a value that works consistently. I’m willing to bet the lower you go the longer your laser tube will last.
Thanks so much for reading and I’m looking forward to your review.
-Rich
LikeLike
Hi Richard,
nice blog, mate. I have a question – my cutter is getting weaker and weaker. I’ve been running the machine for over a year now and done mostly wood engraving. Now, I must increase the mAh level to get desired results. Or, the mirrors might be damaged or “burned”? I twisted the mirrors a bit, but it seems not helped at all. If the tube needs replacement, where do you recommend should I buy it to make sure I get the right one? Or is it better to buy new machine all included?
Thank you for your response.
Tom
LikeLike
Hi Tomas,
If I had to buy a tube I’d buy it on eBay. I would certainly hesitate to replace the tube though because the entire machine can be had for just over $300 and a tube by itself is going to be about half the price of the entire machine. It’s probably not too difficult to replace the laser but you had better make sure that’s the part you need.
I can’t think of any easy way to test the laser but if anyone else can chime in here please do so.
Thanks so much for reading and let everyone know if you were able to fix your problem.
-Rich
LikeLike
I had the same problem, fixed with a new tube
Chris
LikeLike
Have you checked the alignment ? new mirrors / len is a good place to start as they are a lot cheaper than the alternative plus if it’s not them you’ll have a spare set to hand for your new model..
If I was to get a new laser tube I’d be worried my PSU would pop it as soon as I connected up so I would probably end up getting a new PSU and tube to be safe.. then I’d think hmmm well it si probably best to swap the mirrors and len if I have anew tube.. So yep I think I’d end up as Richards suggests and get a new machine or at least think v carefully about the difference in costs vs time and hassle. Reading stuff on other forums though a slow decline in power is normally something up with the mirrors, lens or alignment. Cooling can be another thing that degrades the tube (so I’ve read) …
LikeLike
Hi Richard,
Great blog post! I’ve mostly watched youtubes with the k40 up to now and this post is timely. I may be purchasing the laser soon. Have you tried engraving on anodized aluminium and do you think the precision is sufficient for engraving on pens?
Vince
LikeLike
Hello Vincent,
My apologies for the late response.
I have not tried engraving anodized aluminum but I’ve heard it is possible.
This has very good precision although if I were going to engrave pens I would attach a laser sight for alignment. Otherwise you will have to guess at the position every time you start. I have seen a laser alignment rig that was laser cut from 1/8″ (3mm) acrylic and I can find the link for you if you’re interested. Also please make sure the pen is made of a safe material for laser cutting. PVC is very dangerous to laser cut and Polyethylene (LDPE/HDPE) just melts.
Thanks so much for reading and I best of luck engraving.
-Rich
LikeLike
Thank you very much for your kind help. I was thinking the same about alignment. Some K40s are sold with laser pointers apparently I have to decide if that is what I’ll acquire.
LikeLike
I currently use the K40 for engraving pens and pen boxes. I have had it for about 4 months now and “SO FAR” no problems
LikeLike
Hi Ray,
I have to say other than the initial mirror alignment I’ve had no major problems either. I’m very happy with it overall and it was well worth what little I spent on it.
-Rich
LikeLike
do you think this laser is suitable to perform texture of the wooden bow tie ? as this example which I enclose:
https://www.google.it/search?q=woodillon&client=tablet-android-lenovo&prmd=ismvn&source=lnms&tbm=isch&sa=X&ved=0ahUKEwjIz5-IzbDKAhVFcRQKHQIvC1sQ_AUIBygB&biw=601&bih=962#imgrc=oab9wjpdcpUVrM%3A
LikeLike
Hello Ferdinando,
My apologies for the late response.
I believe the precision is good enough to engrave or cut 1/8″ (3mm) wood however I doubt you would be able to get an even texture. This laser cutter is a 2D cutter and is incapable of engraving with an accurate and consistent depth. One thing I’m sure you could do is cut a texture out of 1/16″ (1.5mm) wood and then glue it to another piece of wood. This will ensure a consistent cutting depth however it will be layered wood which could be an interesting look.
Thanks so much for reading and let me know if you have any more questions. Good luck cutting.
-Rich
LikeLike
I just received my 40w cutter from eBay today. I unboxed it, cleaned out the Styrofoam bits that had broken off the packing materials and removed the packimg foam. I have not done anything else with it yet. My unit has a small dent in one side, but all the wiring, laser tube and electronics seem to be intact.
I was wondering if someone could tell me how the bed is used. Do I just lay materials on the metal framework? I also had an idea to put an upside down floor tile in the base of the machine (I often use tiles to protect my table when soldering) to protect the bottom surface. Is this necessary?
Does anyone know how to use the spring-loaded sliding insert in the bed? Is this some kind of clamping mechanism for small pieces of material?
Also, after reading this great post and these comments, I think it would be a good idea to add an emergency stop button to the control panel (I know there is the large power switch but a big button would be better) and I may also wire in a door-open switch for the cutter door. I bought laser safety glasses, but I’m still paranoid about my eyes… other than aligning mirrors (even then I will close the door while firing) there is no good reason to open the door while operating and I think it is worth a safety switch.
Am I too paranoid?
Thanks,
J
LikeLike
I have one of these laser engravers with a modified control panel (according to the seller), I am having problems getting it to cut or engrave to the correct size, it seems to always try to produce the artwork at less than 1/3 the size and I can not find the cause or any posts online to explain this. I have checked that the software settings are all the same as on the ‘tutorial’ films and you tube videos but this doesn’t seem to solve the issue.
Can anyone help as I am going mad trying to figure it out!
Kind Regards
Richard
LikeLike
Does anyone have any ideas on the sizing issue that we have with this engraver?
LikeLike
Hi Richard,
If you’re referring to the machines physical size then no. It takes up an entire Ikea desk and I’m not too happy about that.
If you’re referring to the cutting area then I’m pretty happy with it for my needs. Mine will at least fit a 12″ x 12″ board (305mm x 305mm) although I can’t cut the entire board. When I’m done cutting something out I can just flip the board around and use the other end that was hiding under the rest of the case. Not ideal but it works.
-Rich
LikeLike
Hi,
I was referring to my previous comments about the problem with the cut or engraved size not matching the size set for the jpeg, if the design is set to 3″ x 3″ it will cut or engrave the design at just under 1″ x 1″. I can’t figure out why this is happening and wondered if anyone else has any ideas.
Richard
LikeLike
Hi Richard,
I’ve never had any issue with the scaling being incorrect although I’ve never tried to engrave a JPG without converting it to a vector based format first. I typically use Autodesk Inventor and design in Metric. You can also use AutoCAD or pretty much any other CAD or vector package (Adobe Illustrator, Corel Draw, Inkscape, etc..).
If you’re aiming for simplicity you can generate a “stipple” image where the entire image is broken down into dots or my personal preference would be the “TSP” image where the image is converted to a single continuous line. This is also how I create images for the Eggbot. You can Google “Stipple Generator” or “TSP Generator” and you’ll see what I’m talking about. Obviously the more points you create the more accurate your image will be.
There’s actually a great tutorial on creating color images at Hackaday which I recommend you read. Link below.
Full-Color-Edge-Lit Laser Acrylic
Let me know if you have any more problems. You should be free to post now so anyone else will be able to help you as well.
-Rich
LikeLike
Hi,
Thank you, I will have a look in the morning and let you know how I get on.
Richard
LikeLike
Hi,
i just bought one but how can i control the engraving depth ?
how can i decrease or increase it?
thanks
LikeLike
First off, Thank you! This is one of the best articles I have found on this laser and I have found many. Your description is spot on. I have told many people that the instructions were translated from Chinese to English by someone that speaks neither.
OK, mine does not really cut anything other than paper. I have tried cutting 3mm acrylic but it just melts. my mirrors are pretty well aligned. Do you need to use low power, fast speed, and multiple passes to cut something this thin? I thought it would cut this in a single or even 2 passes, I have used 6 passes and it still won’t cut through. It engraves it perfectly. what about 3mm birch plywood? any luck cutting that without it “burning through and leaving the edges blackened?
Do you happen to have a chart of power and speed settings for successfully cutting and engraving different materials?
Also, I would like to swap the mA meter for a digital one to give it better control and repeatability. Do I need any special type as far as connections or shunt or supply voltage?
Thanks, Jeff
LikeLike
I have one of these engravers with a ‘modified’ control panel, I am having difficultly with the sizing of designs, I produce the design in photoshop or coral draw and send it to the laser engraver but it only engraves it at around 1/3 of the document size, if I want a DL sized engraving I need to set it to 33cm x 66cm instead of 11cmx22cm.
I have tried everything to figure this out and I have no idea how to fix this and cant find anything online to explain this.
Can anyone help before I go mad?
Thanks in advance.
Richard
LikeLike
After unboxing the laser machine. I discovered the belt was loose and looks like it doesn’t have a gear or something to hold it on the other end (right side). I check underneath it and not sure if I’m missing a piece or maybe just needed to hook it up somewhere. I really don’t know what to do with it without fixing the belt first. I haven’t use or started using it yet. Please help! ☺
LikeLike
Hi Richard, Thanks for this post.
I just finished getting mine working – same model, similar price. I think I got lucky, too. Even the alignment seems ok. Whew!
Question: Do you have or have made a cheat-sheet for power-vs-speed for various materials?
LikeLike
Does the water pump have to be pushing water into the laser tube for it to fire ?I recently bought a 5040 50 watt Chinese laser,and it will perform the actions but without the laser firing so no cutting or engraving. I noticed the water didn’t seem to be flowing in the laser, so sure if it’s water flow or software issues.
LikeLike
Hi Jim,
If you ran this without flowing water then it’s possible that it’s already burnt out. The water has to be flowing to rapidly remove heat. Water just idling there in the laser tube will rapidly boil and overheat the tube. I can’t hear my pump because it’s relatively quiet so I just lift the “Out” line out of the water and you can visually check that the water is flowing through the system.
-Rich
LikeLike
Hi, its interesting to note that someone on Hackaday has posted how to turn one of these into a 3-D laser cutter by adjust the power “on the fry” at it were. it needs a special board but not that expensive.
http://hackaday.com/2016/03/04/3d-laser-carving-with-the-smoothieboard/
LikeLike
Hi,
I saw that article as I’m an avid HAD reader. While I tend to doubt these machines can do it well that is a very interesting concept.
-Rich
LikeLike
I recently purchased one of these and am just learning how to use it. I was wondering if you could post an image of your setting screen? My screen is set at 100 mm/s and when I click on properties from the LaserDRW screen there is a property listed as “Control for Adjustment” which lists 400 mm/s. Do you have these set at 5 mm/s?
My laser is accurate, but the results are not as clean as I have seen other laser cutters. I have cleaned the mirrors and lens, but I wasn’t sure if maybe the settings are too fast.
Finally, do you have your material even with the metal bed or do you simply set the material on top of the bed?
Thanks,
Bob
LikeLike
Hi Bob,
Depending on the material you’ll have to change the speed. I use between 5mm/s and 8mm/s for Acrylic. If you’re just cutting cardboard or card stock you can easily cut moving at 20mm/s or more. Wood should be pretty similar to acrylic in cutting speed. Ultimately you’ll have to experiment with the material you have to find out what works but 100mm/s is probably only good for cutting the thinnest of materials. You definitely don’t want to go too slow because you’ll either melt or burn the material. If you go too fast you won’t cut all the way through. The sweet spot is somewhere in between.
As for the material I typically cut acrylic in 12″ x 12″ boards (305mm x 305mm). I just lay the board flat on the bed and don’t hold it down with anything. It works just fine although you can’t cut the full area of that board because it is too large.
-Rich
LikeLike
Two more questions – is there a need for goggles if the lid is closed?
And – Do you ground your laser and to what do you ground it?
Thanks again,
Bob
LikeLike
Hi Bob,
The lid should block all IR radiation but I wouldn’t bet my eyesight on it. Always wear goggles.
I have a three prong grounded plug on mine but I wouldn’t worry about it otherwise. You should always be watching this while it’s running.
-Rich
LikeLike
Hi, good helpful website. Did your machine come with a three prong grounded plug or did you add this yourself?
LikeLike
Hi Peter,
My apologies for the late response. Much to my surprise mine came with a three prong outlet from the factory. I wouldn’t bet money that it was properly grounded but it’s there.
-Rich Grisafi
LikeLike
Hello
Very good blog. Looking at the image of your machine is this one here the same machine ?
http://www.automationtechnologiesinc.com/products-page/laser-engraving/co2-laser-machine-software-training
How is your machine doing a year and half later since the blog ?
What materials have you been able to engrave and cut ?
Thanks very much
Mark
LikeLike
Hi Mark,
My laser cutter is still doing well although I admittedly don’t use it that often. I used it last month to cut some acrylic and it worked just fine. I definitely used it much more when I bought it but I still say it was worth the purchase and if mine broke I would order the exact same thing (or likely repair mine). I’ve mostly used it for acrylic but I’ve cut 3mm plywood and cardboard as well. Cutting cardboard is rough because you can easily start a fire (I have) but I’ve never had any problems with anything else. I try to stick to the basics when possible because I know the properties and I don’t have to worry about safety issues.
-Rich
LikeLike
Hi Richard,
Best blog I have found!
I finally got all my mirrors aligned and cleaned but it still won’t cut acrylic. It engraves anodized aluminum beautifully but when I try to cut 3mm acrylic it wants to flame up, turn it black, and melt it rather than cutting.
I have tried speeds from 3mm to 8mm and power from 20% to 80% with pretty much the same results. melting, not cutting.
my mirrors are aligned to within less than 1/2 mm when checking at all 4 corners of the rails.
Any suggestions.
What speed and power settings do you use for 3mm acrylic? Air assist?
if yes, PSI?
I would also like to try cutting some 3mm birch plywood and could use those settings as well if this is something you have tried.
Thank you for any advice you can give.
This laser is awesome for engraving but I will be a lot happier with it if I can get it to cut.
Thanks, Jeff
LikeLike
Hi Jeff,
Sorry for the late response. I admittedly don’t come here as often as I should. I hope you’ve solved your problem by now but I typically cut Acrylic at about 25% power and between 5mm/s and 8mm/s. Most of the time I have no problem cutting Acrylic but there are a few colors/brands that have given me trouble. There is a particular sheet of black acrylic that melts more than I’d like. There is also a clear acrylic I buy that cuts without any issue at 8mm/s. You would think that the clear would transmit much of the laser energy and the black would easily absorb it so it’s my theory that this all comes down to chemical composition. The black acrylic just seems to be chemically different from the clear acrylic and therefore it is much more difficult to cut.
If you have no problem cutting other things then my best advice would be to change your acrylic supplier.
Let me know how it works out. Thanks so much for reading.
-Rich
LikeLike
Hi,
I just purchased one the same laser cutter for doing my uni models and keep having the same issue, it engraves but will not cut anything. Is that due to the laser not being aligned? Ive tried cardboard/perspex even balsa wood and it will not cut it. The cd was not much help.
LikeLike
Hi Alan,
I was able to engrave but not cut at first. Once I aligned my mirrors it would cut through pretty much anything you would expect it to cut.
First align your mirrors according to the guide. If you are able to focus your lens then check that as well. If you have never aligned your mirrors this is the most likely cause.
-Rich
LikeLike
Hi Richard, I’ve had my machine for over a year now and I can’t seem to make it cut now, I’m trying to cut 3mm MDF which I have cut several times before and it doesn’t go deeper than half a milimiter, I’ve alligned the mirrors and power seems fine the gauge goes up to 20 with no problem, what am I missing? Thanks
LikeLike
Hi Missael,
Unfortunately many things can make this happen. It could be anything from dirty mirrors/lens to a composition change in your MDF. There is one particular type of Black Acrylic I’ve had difficulty with however it just slices right through clear or white with no issue.
Clean the mirrors and lens with camera lens wipes if possible. It seems like your power supply is alright since you seem to be getting the appropriate current.
I’m not sure how often you cut but I can’t imagine these taking heavy use for a year.
-Rich
LikeLike
hi, richard i have the A 40W LASER CUTTER FROM EBAY the exact one pictured above and it didnt come with a usb stick what can i do because the software keeps saying usb not plugged is there anywhere i can get one or get the software in the usb
LikeLike
Hi Ola,
I certainly hope you’ve solved your problem by now but unfortunately the USB stick is the “key” to using the software. I find it funny how they thought it was fine to ship a pirated copy of Corel Draw but their own software has to have high profile DRM attached to it. The key is coded to the control board as is my understanding. Every board has a unique ID which you can see if you check the inside of the laser cutter. It’s likely that the seller will send you another board/key combination if you let them know. You’re probably not the first one this has happened to.
Let me know how this worked out. Thanks so much.
-Rich
LikeLike
Mine arrived intact and with the mirrors aligned – BONUS – still fiddling with getting the right amount of burn strength for engraving wood – I found that if I could just see the sparkle of the beam on the wood – that was the best setting. Not sure which is the best program to use to import pictures as with laserDRW – it seems to have an all or nothing burn – either burn or not – but since the beam is not modulated for strength – I expect that.
LikeLike
Hi. Why does the alignment of the mirrors go out? My machine was just cutting fine but then started to have a problem of cutting through on the left hand side. I checked the alignment and had to fix it.
LikeLike
Hi Lynette,
My apologies for the late response. Over time it’s bound to happen that they come out of alignment through vibration.
One thing you can do is to buy yourself a small tube of Loctite thread locker and apply it to the thread of the alignment thumbscrews.
For a less permanent solution determine the type of thread that’s on the alignment screws (Likely Metric M3 or M4) and buy a bag of nuts with the same thread. Thread the nuts onto the thumbscrews all the way to the head and then align the laser cutter. Once aligned loosen the nuts (not the screws) until they are tightly pressed against the threaded hole. Since they can’t loosen and tighten at the same time this will essentially lock them in place although allow you to remove them later if you have to.
Let me know if you have any questions and thanks for reading.
-Rich
LikeLike
Hello Rich: I am interested in this for only one reason: plaques that are given during awarding ceremonies and name plates on trophies. I dont have anything to cut. the material has a “coat” on top: like Black, red and dark blue. I have seen a shop where their laser “burns” the coating away and exposes the sheen below. please tell me if this can do the job and i will buy it. thanks.
LikeLike
Hello,
My apologies for the late response. While I’m not making any guarantees this machine should have no problem engraving the coating on a brass nameplate. The only thing that would concern me is the long term effect of the laser being reflected off the brass back into the lens. Under no circumstance can you expect to cut or engrave a reflective surface with this laser. If you have small pre-cut pre-coated placards to engrave this should be no problem.
-Rich
LikeLike
using windows 8.1 is this ok as drives wont install cd come with it but in chinneese any help please
LikeLike
Hi Paul,
I was unable to get this running with Windows 8/8.1. I designed everything on my Windows 8.1 desktop in Corel Draw but I couldn’t get Corel Laser or LaserDRW to run on it. I had to use an old Windows 7 laptop to do the actual cutting. I’m not sure why they don’t support Windows 8 to 10 but they don’t.
-Rich
LikeLike
Mine is working on Windows 8.1
LikeLike
hi richard i sorted it out and tested on a ply sheet did a oval shape laser did it no problem .so i put text in the oval and run test oval was ok but text was backwards . is there something i need to change on or off on laserdraw see it says mirror but thats not selected .any idears please
paul
LikeLike
hi Richard . ok got win 8.1 to work with laser .when switched on laser goes to top left ok , when send image to cut/engrave the head moves down to the bottom right corner and starts working and crashes in bottom frame also changed settings to different places but does the same thing .can you advise what could be happing
LikeLike
hi Richard reinstalled software seems to be ok now doing what it asked to do. now got to figure out were erase is on laserdrw programme normally rubber icon but cant find it.
LikeLike
Hi Richard
I revel entry purchase the 40w high precise laser cutter/engraver. I have managed to engrave and cut on a square block. I have been trying to find a video or instructions on how to measure for small items like plaques/ small objects etc but don’t know how to measure the distance to get it aligned in the right place. Any help would be much appreciated or where I can find a video showing what settings are needed on the computer programme.
LikeLike
Hello Richard,
My apologies for such a late response. I was away for most of August on business trips and a short vacation.
That’s actually a good question. Higher end laser cutters typically have a visible laser dot to show where the cutting laser is aligned. Mine (and I’m assuming yours) is not high end and therefore doesn’t have this benefit.
I saw a post on Hackaday one time describing a cheap mod to add a crosshair. The post is located here.
Crosshair Aiming System for your Laser Cutter
After another quick search I just found another one on Instructables
Laser Cutter Crosshair
I would venture to say that the crosshair is superior to the dot so if you’re going to put the effort in then it’s probably best to create one of these mods.
I rarely do any engraving so I myself just fire a test shot to see where the laser is. I would agree that this is not ideal for engraving.
-Rich
LikeLike
Hi guys, this is great site for us who intend to buy K40.
Anyone from Melbourne here? I would like to hear more about which seller to choose on ebay. I don’t expect there is a local representative or support Down Under.
LikeLike
Hello Slikar,
My apologies for such a late response however I was away for most of August on a combination of business trips and vacation. Thanks for your kind words.
While myself and others here are more than willing to help you I wouldn’t count on any support from the seller or manufacturer.
Maybe not the absolute worst customer service I’ve ever had but it’s certainly up there.
-Rich
LikeLike
Hi, thanks for this post,
I got this K40 recently and have issues with big irregularities of cutting/engraving depending on the place on cutting area: from ok on the top-left to inexistant on the bottom-right. I did aligned/cleaned the mirrors, so I’m wondering what can I do to solve this..
I’ll be very grateful for some help!
thanks
LikeLike
Hello Gary,
My apologies for the late response. I was away for most of August.
Pretty much everything you said still points to misaligned mirrors. If you are cutting correctly in one area that means the entire system is functioning as it should and the mirrors and lens are clean. If it’s not cutting at all in another area then that means the laser is not reaching the work piece. Ultimately the only thing that could prevent a solid beam from reaching the work piece is the mirrors.
Try to align your mirrors again and use receipt tape if possible. It’s frustrating and it took me a few tries to get it just right.
-Rich
LikeLike
Hi all
I just got my k40 and am just setting up and have a question regarding the ground lead in the back. Is that necessary and if so how do I wire it and to what? Any help is appreciated. Thank you
-Jose
LikeLike
Hello Jose,
Is it necessary for operation? No, but it is advised for safety reasons. Ultimately you are using a somewhat high voltage device around water so it is always wise to make sure it is properly grounded.
I’m not sure what your set up is like but if you are concerned you should consult an electrician to make sure it is properly grounded.
My cable had a three prong plug so in theory it is already grounded.
-Rich
LikeLike